Understanding MCP: What It Is, What It Isn't, and How to Build It

Introduction
This post explains MCP, showing why it’s not just a REST replacement, and walks through a practical use case explaining. A working use case showing MCP in action that will help you grasp the concept better. Even though MCP was introduced to the world in late 2024 by Anthropic, it’s adoption in the world of AI has been swift. MCP was created at Anthropic by engineers David Soria Parra and Justin Spahr-Summers. In December 2025, Anthropic donated the MCP to the Agentic AI Foundation, a directed fund under the Linux Foundation, making it truly vendor-neutral and community-driven going forward. By the end of this blog we will get a high level understanding about why MCP is called the USB-C for AI
What is MCP?
MCP stands for ‘Model Context Protocol’. It is an open standard that allow AI applications to interact with data systems.
Why MCP?
MCP standardises the way an AI system connect to external tool or data sources. The AI system can be an AI application that you’ve developed or AI assistants like Claude, Grok, chatgpt, gemini etc. An example would give a better understanding:
Let’s say we are building an AI application called “Efficient Me” which needs access to your calendar to understand your workload and optimise your time based on certain guidelines. So, we code a connector which connects our AI application to the google calendar. The Application would also need access to your slack to notify you about only important meetings, messages and discussion threads. For this another connector has to be written. While implementing a connector, security aspects (for e.g., your gmail credentials should not be exposed to the AI application) should be given prominence.
Writing separate connectors for every custom integration is inefficient and fragmented. MCP solved this very problem by creating a common language so our AI system can work with any service that supports it. MCP serves as an infrastructure to our AI Application by giving it safe, standardised access to our tools and data.
Key Benefits of MCP
- Standardization – Services don’t need to build separate integrations for every AI app; they just support MCP once
- Composability – You can chain multiple tools together seamlessly (e.g., search Drive → create Asana task → send Slack notification)
- Security – Credentials and permissions stay on your machine; Claude doesn’t see them directly
- Extensibility – Developers can build custom MCP servers for proprietary or niche systems
⚠️ A Note on Security
While MCP’s architecture provides security benefits, connecting public MCP servers requires caution. We’ll dive into security considerations in detail later in this post, but keep this in mind: not all public servers are equally trustworthy. Verify the source, check for HTTPS+OAuth, and ensure you trust the maintainers before connecting.
MCP Architecture
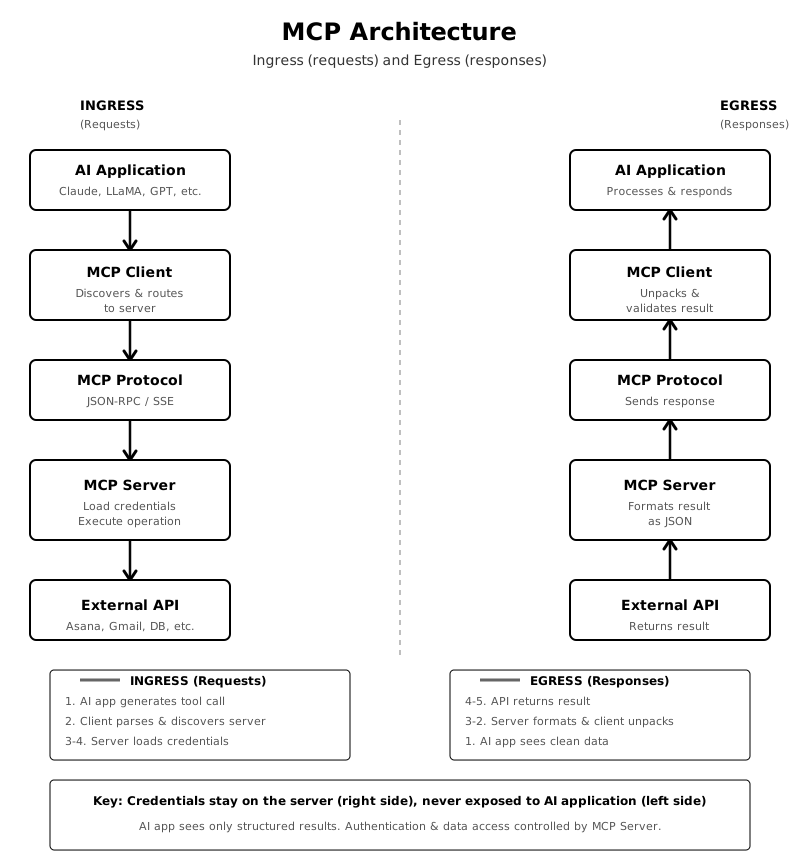
The Basic Flow is as follows:
- You connect a service (e.g., Gmail) via AI app
- MCP establishes a connection between AI app and that service
- AI app can now call tools on that service (read emails, create tasks, etc.)
- Results come back for AI app to processes them
Now you might wonder: “Doesn’t this sound like a REST API?” The answer is nuanced. While both MCP and REST are remote procedure call (RPC) systems—asking a remote system to do something and getting results back—they serve fundamentally different purposes and are optimized for different scenarios. Let’s explore these distinctions.
REST API and MCP: Clear distinction
When trying to understand MCP, one might correlate it to REST API. The main reason for this correlation is that both REST and MCP are Remote Procedure Call (RPC) systems i.e., asking a remote system to do something and get the restult back. When questions like “can MCP replace REST?” popup in our minds we need to understand the nuances to answer them.
The key distinction is that:
- REST is about endpoints that many clients call. For example, a website and a mobile app can both hit the same endpoints.
- MCP is about tools (i.e., functions) that an AI app/Claude can understand and invoke. For example, Claude decides which tool to call based on the user input which under the hood results in MCP client making the call to the MCP server to fulfill a user request.
REST vs MCP
| Dimension | REST | MCP |
|---|---|---|
| Core concept | RPC via HTTP | RPC via JSON-RPC |
| Discovery | OpenAPI schema | MCP schema |
| Authentication | Client provides credentails (header) | Server holds credentials |
| Error Handling | HTTP status code + JSON | JSON text response |
| Optimised for | Many clients and high performance | 1-2 servers per user and seconds of latency acceptable |
Now the question is when can MCP actually replace REST and what is practical?
- Internal systems: You’re building a system where the AI application(like claude) is the only client. In this case No REST API needed; MCP is simpler.
- Wrapping existing REST: There is public REST API that is already used by other apps. Build an MCP server that wraps it for your AI APP. Both coexist—REST for scale, MCP for your custom AI APP.
- Credential-sensitive operations: You want your AI application to call Gmail without handling keys. MCP server is practical in this case as it manages the auth part, your AI APP will never see the secrets.
It is not REST or MCP, in the real world it is REST and MCP. REST APIs handle the infrastructure, serving as the backbone and MCP wraps part of it as a AI APP facing interface.
MCP vs Tool Calling
MCP and Tool calling is confusing for the people who are new to world of AI engineering. They are two essential AI concepts which are important to be absorbed.
Tool Calling (also called Function Calling)
A Tool calling provides the ability for an AI model to request external functions be executed. It is used by all modern LLMs(OpenAI, Claude, Gemini, Llama, etc.). The purpose is to turn AI from text generator/predictor into an action-taking agent. For example, User asks “What’s the weather in Bengaluru?” → AI decides to call get_weather() function → gets real data → responds. Without tool calling it can only guess but with an authentic get_weather() function call the response is precise.
MCP (Model Context Protocol)
MCP is a standardized protocol for exposing and discovering tools securely. It is used by all modern LLMs. The purpose is to stop building N×M custom connectors; build server once (by defining tools once within) and use it as USB whenever wherever it is needed. For e.g., GitHub MCP server exposes tools which can be used by ChatGPT, used by Claude Application and also used by Gemini serving its purpose of build once and use everywhere.
MCP Types
Before getting into MCP server we need to understand MCP types. There are 3 MCP types namely tools, resources and prompt context. Below table helps understand each type better:
| Description | Tools | Resource | Prompts |
|---|---|---|---|
| Who Controls It | AI Model | Application | User/Application |
| When Is It Invoked | When AI decides it is needed | When app decides to load it | When user explicitly selects it |
| Use Case | send an email | Here is the context for decision making | Write a weekly report using this template |
| Discovery Method | tools/list | resources/list | prompts/list |
| Frequency Of Use | Very common | Growing Emerging / Underutilized | |
| Can Modify State? | Yes (create, update, delete) | No (read-only) | No (instructions only) |
Security Considerations During Implementation
Before we build our calculator example, it’s worth noting that in real-world scenarios, MCP servers handle sensitive operations like reading your calendar or sending emails. The basic calculator we’ll build is low-risk, but the principles you’ll learn apply equally to security-critical servers. We’ll explore comprehensive security best practices later in this post.
MCP in action
Check out the source code on GitHub-MCP-calculator.
How to build a simple MCP server using python?
Let us build a simple calculator MCP which does basic arithmetic operations.
Step 1 : MCP module installation
> pip install mcp
Step 2 : Create simple_mcp_server.py
Step 2.1: Import module
import asyncio
from mcp.server.fastmcp import FastMCP
Refer to Appendix A below for a better understanding of asyncio
Step 2.2: Create MCP server instance
mcp = FastMCP("calculator")
Step 2.3: Define tools that MCP will expose
@mcp.tool()
def add(a: float, b: float) -> float:
    """Add two numbers together"""
    return a + b


@mcp.tool()
def subtract(a: float, b: float) -> float:
    """Subtract b from a"""
    return a - b


@mcp.tool()
def multiply(a: float, b: float) -> float:
    """Multiply two numbers"""
    return a * b


@mcp.tool()
def divide(a: float, b: float) -> float:
    """Divide a by b"""
    if b == 0:
        raise ValueError("Cannot divide by zero")
    return a / b


@mcp.tool()
def power(base: float, exponent: float) -> float:
    """Raise base to the power of exponent"""
    return base ** exponent


@mcp.tool()
def square_root(number: float) -> float:
    """Calculate the square root of a number"""
    if number < 0:
        raise ValueError("Cannot calculate square root of negative number")
    return number ** 0.5
Step 2.4 Run the server
  if __name__ == "__main__":
    print("=" * 60)
    print("🔧 Calculator MCP Server")
    print("=" * 60)
    print("\nAvailable tools:")
    print("  • add(a, b) - Add two numbers")
    print("  • subtract(a, b) - Subtract b from a")
    print("  • multiply(a, b) - Multiply two numbers")
    print("  • divide(a, b) - Divide a by b")
    print("  • power(base, exponent) - Raise base to power")
    print("  • square_root(number) - Calculate square root")
    print("\nStarting server on stdio...")
    print("=" * 60)
    print("\n✅ Server running. Connect your client to use these tools.\n")

    # Run server using stdio transport
    mcp.run(transport="stdio")
Step 3 : Create app with mcp client
Step 3.1: Import modules
import asyncio
import sys
from typing import Optional
from contextlib import AsyncExitStack
from mcp import ClientSession, StdioServerParameters
from mcp.client.stdio import stdio_client
from openai import OpenAI
from dotenv import load_dotenv
Step 3.2: Create CalculatoMCPClient Class
Step 3.2.1: Initiate the Class
class CalculatorMCPClient:
    """Client for the Calculator MCP Server using OpenAI GPT"""

    def __init__(self):
        self.session: Optional[ClientSession] = None
        self.exit_stack = AsyncExitStack()
        self.client = OpenAI()  # Uses OPENAI_API_KEY from env
        self.tools = []
        self.model = "gpt-4o-mini"  # Fast and capable for calculations
Step 3.2.2: Create a connect_to_server method
    async def connect_to_server(self, server_script_path: str):
        """
        Connect to the MCP Calculator Server

        Args:
            server_script_path: Path to calculator_server.py
        """
        try:
            # Create server parameters for stdio connection
            server_params = StdioServerParameters(
                command="python",
                args=[server_script_path]
            )

            print(f"🔗 Connecting to MCP server: {server_script_path}")

            # Connect using stdio
            read, write = await self.exit_stack.enter_async_context(
                stdio_client(server_params)
            )

            # Create and initialize session
            self.session = await self.exit_stack.enter_async_context(
                ClientSession(read, write)
            )
            await self.session.initialize()

            # Get available tools
            tools_response = await self.session.list_tools()
            self.tools = tools_response.tools

            print(f"✅ Connected successfully!")
            print(f"📊 Available tools: {len(self.tools)}")
            for tool in self.tools:
                print(f"   • {tool.name}")

        except Exception as e:
            print(f"❌ Error connecting to server: {e}")
            raise
Step 3.2.3: Create an internal method for converting MCP tools to OpenAI function calling format
    def _format_tools_for_openai(self) -> list:
        """Convert MCP tools to OpenAI function calling format"""
        openai_tools = []

        for tool in self.tools:
            openai_tool = {
                "type": "function",
                "function": {
                    "name": tool.name,
                    "description": tool.description,
                    "parameters": tool.inputSchema
                }
            }
            openai_tools.append(openai_tool)

        return openai_tools
Step 3.2.4: Create a method to process user query using OpenAI GPT and calculator tools
    async def calculate(self, user_query: str) -> str:
        """
        Process a user's math query using OpenAI GPT and calculator tools

        Args:
            user_query: The user's math question or request

        Returns:
            GPT's response with the calculation result
        """
        if not self.session:
            raise RuntimeError("Not connected to server. Call connect_to_server first.")

        # Prepare tools for OpenAI API
        openai_tools = self._format_tools_for_openai()

        print(f"\n👤 You: {user_query}")

        # Initialize message history
        messages = [{"role": "user", "content": user_query}]

        # Keep processing while GPT uses tools
        iteration = 0
        max_iterations = 10  # Prevent infinite loops

        while iteration < max_iterations:
            iteration += 1

            # Send message to OpenAI
            response = self.client.chat.completions.create(
                model=self.model,
                messages=messages,
                tools=openai_tools if openai_tools else None,
                temperature=0.7
            )

            # Check if GPT wants to use a tool
            tool_used = False

            # Process response choices
            for choice in response.choices:
                if choice.finish_reason == "tool_calls":
                    tool_used = True

                    # Add assistant's response to messages
                    messages.append({
                        "role": "assistant",
                        "content": choice.message.content or "",
                        "tool_calls": choice.message.tool_calls
                    })

                    # Process each tool call
                    tool_results = []
                    for tool_call in choice.message.tool_calls:
                        tool_name = tool_call.function.name
                        tool_input = eval(tool_call.function.arguments)  # Parse JSON string
                        tool_use_id = tool_call.id

                        print(f"   🔧 Using tool: {tool_name}")
                        print(f"   📥 Input: {tool_input}")

                        # Call the tool on the MCP server
                        try:
                            result = await self.session.call_tool(tool_name, tool_input)

                            # Extract result text
                            result_text = result.content[0].text if result.content else "No result"

                            # Handle numeric results
                            try:
                                result_value = float(result_text)
                                print(f"   📤 Result: {result_value}")
                            except (ValueError, TypeError):
                                print(f"   📤 Result: {result_text}")

                            tool_results.append({
                                "tool_call_id": tool_use_id,
                                "result": result_text
                            })

                        except Exception as e:
                            error_msg = f"Error: {str(e)}"
                            print(f"   ❌ {error_msg}")
                            tool_results.append({
                                "tool_call_id": tool_use_id,
                                "result": error_msg
                            })

                    # Add all tool results to messages
                    for tool_result in tool_results:
                        messages.append({
                            "role": "tool",
                            "tool_call_id": tool_result["tool_call_id"],
                            "content": tool_result["result"]
                        })

                elif choice.finish_reason == "stop":
                    # GPT finished and didn't use tools
                    final_response = choice.message.content or "No response"
                    print(f"\n🤖 OpenAI: {final_response}")
                    return final_response

            # If tool was used, continue the loop to get GPT's next response
            if not tool_used:
                break

        return "Max iterations reached"
Step 3.2.5: Create a method to run in interactive mode for a user to ask math questions
    async def interactive_mode(self):
        """
        Run an interactive loop where a user can ask math questions
        """
        print("\n" + "=" * 60)
        print("💬 Calculator Chat with OpenAI (Interactive Mode)")
        print("=" * 60)
        print("\nTry asking things like:")
        print("  • What is 25 times 4?")
        print("  • Calculate the square root of 144")
        print("  • What's 100 divided by 4?")
        print("  • What is 2 to the power of 10?")
        print("\nType 'quit' or 'exit' to stop\n")

        while True:
            try:
                user_input = input("Enter a math question: ").strip()

                if user_input.lower() in ['quit', 'exit']:
                    print("👋 Goodbye!")
                    break

                if not user_input:
                    continue

                await self.calculate(user_input)

            except KeyboardInterrupt:
                print("\n👋 Goodbye!")
                break
            except Exception as e:
                print(f"Error: {e}")

    async def cleanup(self):
        """Clean up resources"""
        await self.exit_stack.aclose()
Step 3.3: Define main method
async def main():
    """Main entry point"""

    # Check if server path was provided
    if len(sys.argv) < 2:
        print("Usage: python calculator_client_openai.py <path_to_calculator_server.py>")
        print("\nExample:")
        print("  python calculator_client_openai.py ./calculator_server.py")
        print("\nMake sure calculator_server.py is running in a separate terminal:")
        print("  python calculator_server.py")
        print("\nAlso ensure OPENAI_API_KEY is set in .env or environment")
        sys.exit(1)

    server_path = sys.argv[1]
    client = CalculatorMCPClient()

    try:
        print("=" * 60)
        print("🧮 Calculator MCP App with OpenAI")
        print("=" * 60)
        print(f"Model: {client.model}")

        # Connect to server
        await client.connect_to_server(server_path)

        # Run interactive mode
        await client.interactive_mode()

    except Exception as e:
        print(f"❌ Error: {e}")
        import traceback
        traceback.print_exc()
    finally:
        await client.cleanup()
Step 3.4: Run the Calculator Tool
if __name__ == "__main__":
    asyncio.run(main())
Calculator App with MCP Server in Action
% python Calculator_MCP_Client.py
Usage: python calculator_client_openai.py <path_to_calculator_server.py>

Example:
  python calculator_client_openai.py ./calculator_server.py

Make sure calculator_server.py is running in a separate terminal:
  python calculator_server.py

Also ensure OPENAI_API_KEY is set in the .env or environment

% python Calculator_MCP_Client.py ./Calculator_MCP_Server.py
============================================================
🧮 Calculator MCP App with OpenAI
============================================================
Model: gpt-4o-mini
🔗 Connecting to MCP server: ./Calculator_MCP_Server.py
[06/04/26 23:49:31] INFO     Processing request of type ListToolsRequest
✅ Connected successfully!
📊 Available tools: 6
   • add
   • subtract
   • multiply
   • divide
   • power
   • square_root

============================================================
💬 Calculator Chat with OpenAI (Interactive Mode)
============================================================

Try asking things like:
  • What is 25 times 4?
  • Calculate the square root of 144
  • What's 100 divided by 4?
  • Multiply 7 by 8, then add 15
  • What is 2 to the power of 10?

Type 'quit' or 'exit' to stop

Enter a math question: what is 25/5?

👤 You: what is 25/5?
   🔧 Using tool: divide
   📥 Input: {'a': 25, 'b': 5}
[06/04/26 23:50:09] INFO     Processing request of type CallToolRequest                                                                                                       server.py:727
   📤 Result: 5.0

🤖 OpenAI: The result of \( 25 \div 5 \) is \( 5.0 \).
Enter a math question:
Brief note on FastMCP
FastMCP is a Python library that enables creation of MCP servers fast. It is simple and easy to get started.
Getting Started
pip install fastmcp
Simple MCP Server
from fastmcp import FastMCP

mcp = FastMCP("my-server")

@mcp.tool()
def add(a: int, b: int) -> int: #type hints
    """Add two numbers.""" #docstring
    return a + b

if __name__ == "__main__":
    mcp.run()
That’s it. Just save and run the above code, and you’ll have a functioning MCP server that can be integrated with your AI application.
MCP Security Guide for Public Servers
Discussing security of MCP servers in detail will require a separate post. In this section let us understand the precautions to be taken when using public MCP servers. First let us distinguish between Local and Public MCP Severs:
Public MCP Servers
- Hosted on the internet and accessible remotely
- Can be developed by companies, individuals, or open-source communities
- You access them via a public URL (e.g., https://mcp.example.com/sse)
- Examples: Gmail MCP, Google Drive MCP, Asana MCP, etc.
- May or may not require authentication (API keys, OAuth, etc.)
Local MCP Servers
- Run on your local machine or internal network
- You typically access them via localhost or an internal IP address
- Useful for testing, development, or keeping sensitive tools private
- Can be built using MCP SDKs and run in your environment
- Examples: A custom MCP server you build for proprietary data, or a local instance of an open-source MCP server
Generally, Official MCP servers like GitHub, Slack can be trusted, one can also trust Open-source MCP Servers with community reviews, have HTTPS+OAuth+Privacy policy and is actively maintained. It is best to avoid MCP servers with unknown authors, HTTP only, authenticate with raw API tokens and has no documentation or privacy policy.
As a general thumb rule before connecting to ANY public MCP server ensure that:
- It is from a trusted source
- It is actively maintained
- It has proper secure authorization (Like OAuth)
- The remote URL should be HTTPS only
- The access can be revoked easily
- It has permission to access only what is needed
Conclusion
In this post, MCP basics are explained with a very simple example. In terms of practical implementation there is more to be explored and understood especially security in MCP. In future posts regarding MCP we will explore with implemention the different MCP types - tools, resources and prompts, how to make it secure and in general about the precautions to be taken when using public MCP servers.
References
- https://www.anthropic.com/news/model-context-protocol
- https://en.wikipedia.org/wiki/Model_Context_Protocol
- https://newsletter.pragmaticengineer.com/p/mcp
Appendix A: Brief note on asyncio
Asyncio is a handy module which helps run tasks concurrently and not in parallel with the help of async and await syntax. The main building blocks of asyncio is:
- Coroutines: A function that is defined as “async def”. The speciality of this function is that it is not executed immediately when called instead they return a coroutine object that can be paused and resumed.
- Event Loop: This is the central piece of the building block acting as the “orchestrator” of the program. It registers all the tasks and is responsible to pause active task and execute next task whenever a task needs to wait for input and output(I/O)
- Await Keyword: This keyword pauses the execution of a coroutine when the coroutine is waiting for I/O by yielding control back to the event loop, allowing other tasks to run until the awaited operation finishes.
- Tasks: It is a wrapper used to schedule a coroutine on the event loop concurrently by using asyncio.create_task(
) . They allow multiple coroutines to run at the same time
Example code
import asyncio

async def fetch_score(subject_id, delay):
    print(f"Task {subject_id}: Starting fetch...")
    # Simulate a network request (non-blocking pause)
    await asyncio.sleep(delay)
    print(f"Task {subject_id}: Data received!")
    return f"Result {subject_id}"

async def main():
    # Schedule both tasks to run concurrently
    task1 = asyncio.create_task(fetch_score(1, 2))
    task2 = asyncio.create_task(fetch_score(2, 1))

    # Wait for both tasks to finish
    await task1
    await task2

# Start the event loop and run the main entry point
asyncio.run(main())
Comparing asyncio vs threading vs multiprocessing
| Dimension | asyncio | threading | multiprocessing |
|---|---|---|---|
| Model | Cooperative concurrency | Preemptive concurrency | True parallelism |
| Execution | Single thread(event loop) | Multiple threads (one process) | Multiple processes |
| Memory | Shared | Shared | Separate |
| Switching | Use yield control(await) | OS decides/controls | OS decides/controls |
The above table gives you a mental map to understand and differentiate between asyncio, threading and multiprocessing. There is more to explore and learn and understand around the topic of threading and multiprocessing, but for now let’s understand when each can be used: Start with this question: Is the task I am handling CPU-bound? Like a task which is doing heavy mathematical computations or algorithmic calculations. If your answer is “Yes” then “multiprocessing” is the model to chose. Let’s say your answer is “No” and your task is I/O-bound (like disk-reads, network requests etc.,) then you are left with the choice of either “async” or “threading”. The choice here is simple, if your task can use async libraries then “asyncio” should be preferred in your code. In situations wherein your task is using synchronous/blocking/legacy libraries then you’ll have to choose “threading”.