<?xml version="1.0" encoding="utf-8"?><feed xmlns="http://www.w3.org/2005/Atom" ><generator uri="https://jekyllrb.com/" version="3.10.0">Jekyll</generator><link href="https://absorb-a-concept.com/feed.xml" rel="self" type="application/atom+xml" /><link href="https://absorb-a-concept.com/" rel="alternate" type="text/html" /><updated>2026-03-15T18:16:09+00:00</updated><id>https://absorb-a-concept.com/feed.xml</id><title type="html">Absorb a Concept</title><subtitle>This blog serves as a single point of reference for the concepts I have explored.The content of concepts is revised as and when I get a better understanding of it.I am hoping it helps the readers.</subtitle><author><name>author:sathyendhra</name></author><entry><title type="html">FastAPI Tutorial: Architecture, Core Concepts, and a CRUD API Example</title><link href="https://absorb-a-concept.com/technical/2026/02/18/fastapi.html" rel="alternate" type="text/html" title="FastAPI Tutorial: Architecture, Core Concepts, and a CRUD API Example" /><published>2026-02-18T00:00:00+00:00</published><updated>2026-02-18T00:00:00+00:00</updated><id>https://absorb-a-concept.com/technical/2026/02/18/fastapi</id><content type="html" xml:base="https://absorb-a-concept.com/technical/2026/02/18/fastapi.html"><![CDATA[<h1 id="introduction">Introduction</h1>
<p>I’ve been hearing a lot about a Python web framework called FastAPI. The purpose of this post is to understand the basics of FastAPI by exploring:</p>

<ul>
  <li>What is FastAPI?</li>
  <li>When to use it?</li>
  <li>When not to use it?</li>
  <li>FastAPI vs DRF</li>
  <li>FastAPI Architecture</li>
  <li>FastAPI Core Components</li>
  <li>How to get started with a simple project</li>
</ul>

<h3 id="what-is-fastapi">What is FastAPI?</h3>
<p>FastAPI is a Python web framework for building APIs. Decorators (like @app.get(“/end_point”) are used to define endpoints, it uses Python type hints to automatically validate incoming data, convert types and generate interactive API documentation (at /docs) out of the box.</p>

<p>It is built on Starlette (for the web layer) and Pydantic (for data validation)</p>

<h3 id="what-is-starlette">What is Starlette?</h3>
<p>Starlette is a lightweight python web framework built on ASGI (Asynchronous Server Gateway Interface) which is sucessor to WSGI (Web Server Gateway Interface). FastAPI is built on top of Starlette by adding automatic data validation, serialization and API docs to it.</p>

<h3 id="what-is-pydantic">What is Pydantic?</h3>
<p>Pydantic is a python library for data validation using type hints. Let me elaborate with an illustration for better understanding.</p>

<h3 id="pydantic-model-example">Pydantic model example</h3>
<div class="language-plaintext highlighter-rouge"><div class="highlight"><pre class="highlight"><code>from pydantic import BaseModel

class Customer(BaseModel):
    name: str
    age: int
    email: str

user = Customer(name="Alice", age=25, email="alice@example.com")  # works
user = Customer(name="Alice", age="not a number", email="...")    # validation error
</code></pre></div></div>

<p>The above class takes 3 parameters as input name as string, age an integer, and email as string. If the user passes an invalid  data type like e.g., age=”not a number” it will throw a validation error as it is expecting an integer. However, Pydantic does “type coercion”. Let us consider the user passes age=”45”, the expectation is to throw a validation error as the input is a “string” and expected type is “int” but in reality due to the intervention of “type coercion” the string is automatically converted to integer and the execution continues.</p>

<p>FastAPI uses Pydantic under the hood so that when a request comes in, the JSON body is automatically parsed and validated against your model before your function even runs.</p>

<h2 id="when-to-choose-fastapi">When to choose FastAPI?</h2>
<p>One should use FastAPI if speed, validation and clean code take precedence. The best use cases would be:</p>
<ul>
  <li>Building highly performant REST APIs</li>
  <li>ML/AI services</li>
  <li>Auto-generated documentation matters</li>
  <li>Rapid prototyping</li>
</ul>

<h2 id="when-not-to-choose-fastapi">When not to choose FastAPI?</h2>
<p>If your ecosystem is already using a robust framework (like Django for example) it is not advisable to switch to FastAPI unless you have a niche requirement to do so. Some factors to help make the decision are listed below:</p>
<ul>
  <li>Avoid FastAPI if your application involves CPU-Intensive tasks (image processing,video encoding etc). You can workaround it but it is not possible out of the box.</li>
  <li>If you need one web framework with Full Stack needs then FastAPI is not the right fit.</li>
  <li>Asynchronous programming comes with a little bit of learning curve, if the team has less experience in asynchronous programming and do not have the luxury of investing time to learn it then it is advisable not to use FastAPI.</li>
  <li>If your project does not support async or does not have the need of async then it is best to avoid FastAPI. Without async you will lose the primary performance benefit of FastAPI. You can still use FastAPI without async but there are other frameworks better suited for the use case.</li>
</ul>

<h2 id="fastapi-vs-drf">FastAPI vs DRF</h2>

<table>
  <thead>
    <tr>
      <th>Feature</th>
      <th>FastAPI</th>
      <th>DRF</th>
    </tr>
  </thead>
  <tbody>
    <tr>
      <td>Based on</td>
      <td>Starlette+Pydantic</td>
      <td>Django</td>
    </tr>
    <tr>
      <td>Performance</td>
      <td>Very fast</td>
      <td>Slower</td>
    </tr>
    <tr>
      <td>Object Relational Mapping</td>
      <td>Not built-in</td>
      <td>Django ORM (built-in and powerful)</td>
    </tr>
    <tr>
      <td>Admin Panel</td>
      <td>No</td>
      <td>Yes (Django admin)</td>
    </tr>
    <tr>
      <td>Authentication &amp; Permissions</td>
      <td>Basic</td>
      <td>Rich &amp; built-in)</td>
    </tr>
  </tbody>
</table>

<h1 id="core-components">Core Components</h1>

<p><img src="/assets/images/fastapi/fastapi-architecture.png" alt="fastAPI_Architecture" /></p>

<ul>
  <li>
    <p>ASGI Server (Uvicorn)
The server that runs the FastAPI app. It receives HTTP requests from clients and sends responses back. Built on uvloop (a fast async event loop) and httptools (a fast HTTP parser)</p>
  </li>
  <li>
    <p>Starlette
FastAPI directly subclasses Starlette, inheriting all its capabilities. It handles the routing, middleware, request/response objects, websockets and static files.</p>
  </li>
  <li>
    <p>Pydantic
This component is responsible for data validation. It powers all input validation and output serialization. Once you define a BaseModel using Python type hints, FastAPI enforces it automatically — no extra code needed for it.</p>
  </li>
  <li>
    <p>OpenAPI &amp; Auto Docs
FastAPI auto-generates an OpenAPI schema from your code. Two interactive docs UIs are available out of the box — Swagger UI at /docs and ReDoc at /redoc - without any extra setup</p>
  </li>
  <li>
    <p>Dependency Injection (DI) System
A clean system to share reusable logic across routes — database connections, authentication, configuration. FastAPI resolves dependencies automatically before calling your handler.</p>

    <h4 id="dependency-injection-example">Dependency Injection example?</h4>

    <div class="language-plaintext highlighter-rouge"><div class="highlight"><pre class="highlight"><code>from fastapi import FastAPI, Depends

app = FastAPI()

# --- Dependency function ---
def get_db():
  db = connect_to_database()
  try:
      yield db        # provides the db to the route
  finally:
      db.close()      # runs after the route finishes

# --- Route using the dependency ---
@app.get("/items")
def read_items(db = **Depends**(get_db)):
  return db.query("SELECT * FROM items")
</code></pre></div>    </div>
    <p>Steps:</p>
    <ol>
      <li>Define a dependency function (for e.g., def get_db which returns a database handle)</li>
      <li>Call the dependency function name in the route using “Depends” (Depends(get_db)</li>
    </ol>

    <h4 id="dependency-injection-vs-direct-call">Dependency Injection vs Direct Call</h4>

    <p>Looking at the above example, one may argue that one can use the direct call of the method (e.g., get_db()) why use dependency injection? On
the surface, it looks similar but it does more than a direct call. Below are some points that make it different:</p>
    <ol>
      <li>LifeCycle Management
With a direct call, you have to manage setup and teardown yourself:
        <div class="language-plaintext highlighter-rouge"><div class="highlight"><pre class="highlight"><code>python# Direct — you manage everything
@app.get("/items")
def read_items():
   db = get_db()
   try:
       result = db.query(...)
       return result
   finally:
       db.close()   # easy to forget!
</code></pre></div>        </div>
        <p>With Depends(), the dependency handles it:</p>
        <div class="language-plaintext highlighter-rouge"><div class="highlight"><pre class="highlight"><code>def get_db():
   db = connect()
   try:
       yield db
   finally:
       db.close()   # always runs, even on errors

@app.get("/items")
def read_items(db = Depends(get_db)):
   return db.query(...)   # clean, nothing to manage
</code></pre></div>        </div>
      </li>
      <li>
        <p>Caching within a request
If multiple routes need the same method, Depends() calls it only once per request and reuses the result but with direct call the method is called multiple times within the same request.</p>
      </li>
      <li>Automatic parameter injection
Dependencies can read query params, headers, and path params directly from the request — without you passing anything but with a direct call, you’d have to extract the header manually in every route.</li>
    </ol>
  </li>
  <li>
    <p>Middleware
Functions that run on every request before it reaches your route handler, and on every response before it goes back to the client. Common uses: CORS, logging, authentication, GZip compression.</p>
  </li>
</ul>

<h1 id="fast-api-workflow">Fast API Workflow</h1>

<p><img src="/assets/images/fastapi/fastapi-workflow.png" alt="fastAPI_Workflow" style="width: 50%; height: auto;" /></p>

<h1 id="getting-started">Getting Started</h1>

<h2 id="prerequisites">Prerequisites</h2>
<ul>
  <li>Python 3.10 or higher</li>
</ul>

<h2 id="problem-statement">Problem Statement</h2>
<p>Develop APIs for a book store. The API should be able to list all books in stock, add a new book to the bookstore inventory, update a book entry and delete a book entry</p>

<h4 id="1-install-fastapi-module">1. Install fastapi module</h4>
<p>pip install fastapi uvicorn</p>

<div class="language-plaintext highlighter-rouge"><div class="highlight"><pre class="highlight"><code> % pip install fastapi uvicorn
Collecting fastapi
  Downloading fastapi-0.135.1-py3-none-any.whl.metadata (30 kB)
Collecting uvicorn
  Downloading uvicorn-0.41.0-py3-none-any.whl.metadata (6.7 kB)
....
.....
Successfully installed annotated-doc-0.0.4 annotated-types-0.7.0 anyio-4.12.1 click-8.3.1 fastapi-0.135.1 h11-0.16.0 idna-3.11 pydantic-2.12.5 pydantic-core-2.41.5 starlette-0.52.1 typing-extensions-4.15.0 typing-inspection-0.4.2 uvicorn-0.41.0
</code></pre></div></div>

<h4 id="2-import-libraries-and-create-fastapi-object">2. Import libraries and create FastAPI object</h4>

<div class="language-plaintext highlighter-rouge"><div class="highlight"><pre class="highlight"><code>from fastapi import FastAPI, HTTPException
from pydantic import BaseModel
from typing import Optional

app = FastAPI()
</code></pre></div></div>

<h4 id="3-define-schema">3. Define schema</h4>

<div class="language-plaintext highlighter-rouge"><div class="highlight"><pre class="highlight"><code># Input schema — what the client sends
class Book(BaseModel):
    name: str
    price: float
    in_stock: bool = True

# Update schema — all fields optional for partial updates
class BookUpdate(BaseModel):
    name: Optional[str] = None
    price: Optional[float] = None
    in_stock: Optional[bool] = None

# Output schema — what the API returns
class BookOut(BaseModel):
    id: int
    name: str
    price: float
    in_stock: bool
</code></pre></div></div>
<h4 id="4-fastapi-crud">4. FastAPI CRUD</h4>

<h5 id="41-create---post">4.1. Create - POST</h5>

<div class="language-plaintext highlighter-rouge"><div class="highlight"><pre class="highlight"><code>db = {}   # fake in-memory database
counter = 0

@app.post("/books", response_model=BookOut, status_code=201)
def create_item(item: Book):
    global counter
    counter += 1
    db[counter] = {"id": counter, **item.model_dump()}
    return db[counter]
</code></pre></div></div>
<p>Note: The in-memory database is not recommended for production.</p>

<h5 id="42-read---get">4.2. Read - GET</h5>

<div class="language-plaintext highlighter-rouge"><div class="highlight"><pre class="highlight"><code># Read all
@app.get("/books", response_model=list[BookOut])
def list_items(skip: int = 0, limit: int = 10):
    return list(db.values())[skip: skip + limit]

# Read one
@app.get("/books/{item_id}", response_model=BookOut)
def get_item(item_id: int):
    if item_id not in db:
        raise HTTPException(status_code=404, detail="Book not found")
    return db[item_id]
</code></pre></div></div>

<h5 id="43-update---putpatch">4.3. Update - PUT/PATCH</h5>

<div class="language-plaintext highlighter-rouge"><div class="highlight"><pre class="highlight"><code># PUT — full update, replaces the entire record
@app.put("/books/{item_id}", response_model=BookOut)
def update_item(item_id: int, item: Book):
    if item_id not in db:
        raise HTTPException(status_code=404, detail="Book not found")
    db[item_id] = {"id": item_id, **item.model_dump()}
    return db[item_id]

# PATCH — partial update, only changes fields you send
@app.patch("/books/{item_id}", response_model=BookOut)
def partial_update_item(item_id: int, item: BookUpdate):
    if item_id not in db:
        raise HTTPException(status_code=404, detail="Item not found")
    stored = db[item_id]
    updates = model_dump(exclude_unset=True)
    stored.update(updates)
    db[item_id] = stored
    return db[item_id]
</code></pre></div></div>

<h5 id="44-delete---delete">4.4. Delete - DELETE</h5>

<div class="language-plaintext highlighter-rouge"><div class="highlight"><pre class="highlight"><code>@app.delete("/books/{item_id}", status_code=204)
def delete_item(item_id: int):
    if item_id not in db:
        raise HTTPException(status_code=404, detail="Book not found")
    del db[item_id]
</code></pre></div></div>

<h4 id="5-add-steps-2-to-4-in-mainpy-and-run-below-command">5. Add steps 2 to 4 in main.py and run below command:</h4>

<div class="language-plaintext highlighter-rouge"><div class="highlight"><pre class="highlight"><code>% uvicorn main:app --reload
INFO:     Will watch for changes in these directories: ['/Users/sathyendhra/django_project3/fastapi-project']
INFO:     Uvicorn running on http://127.0.0.1:8000 (Press CTRL+C to quit)
INFO:     Started reloader process [29028] using StatReload
INFO:     Started server process [29030]
INFO:     Waiting for application startup.
INFO:     Application startup complete.
</code></pre></div></div>

<h4 id="9-open-http1270018000docs-in-the-browser">
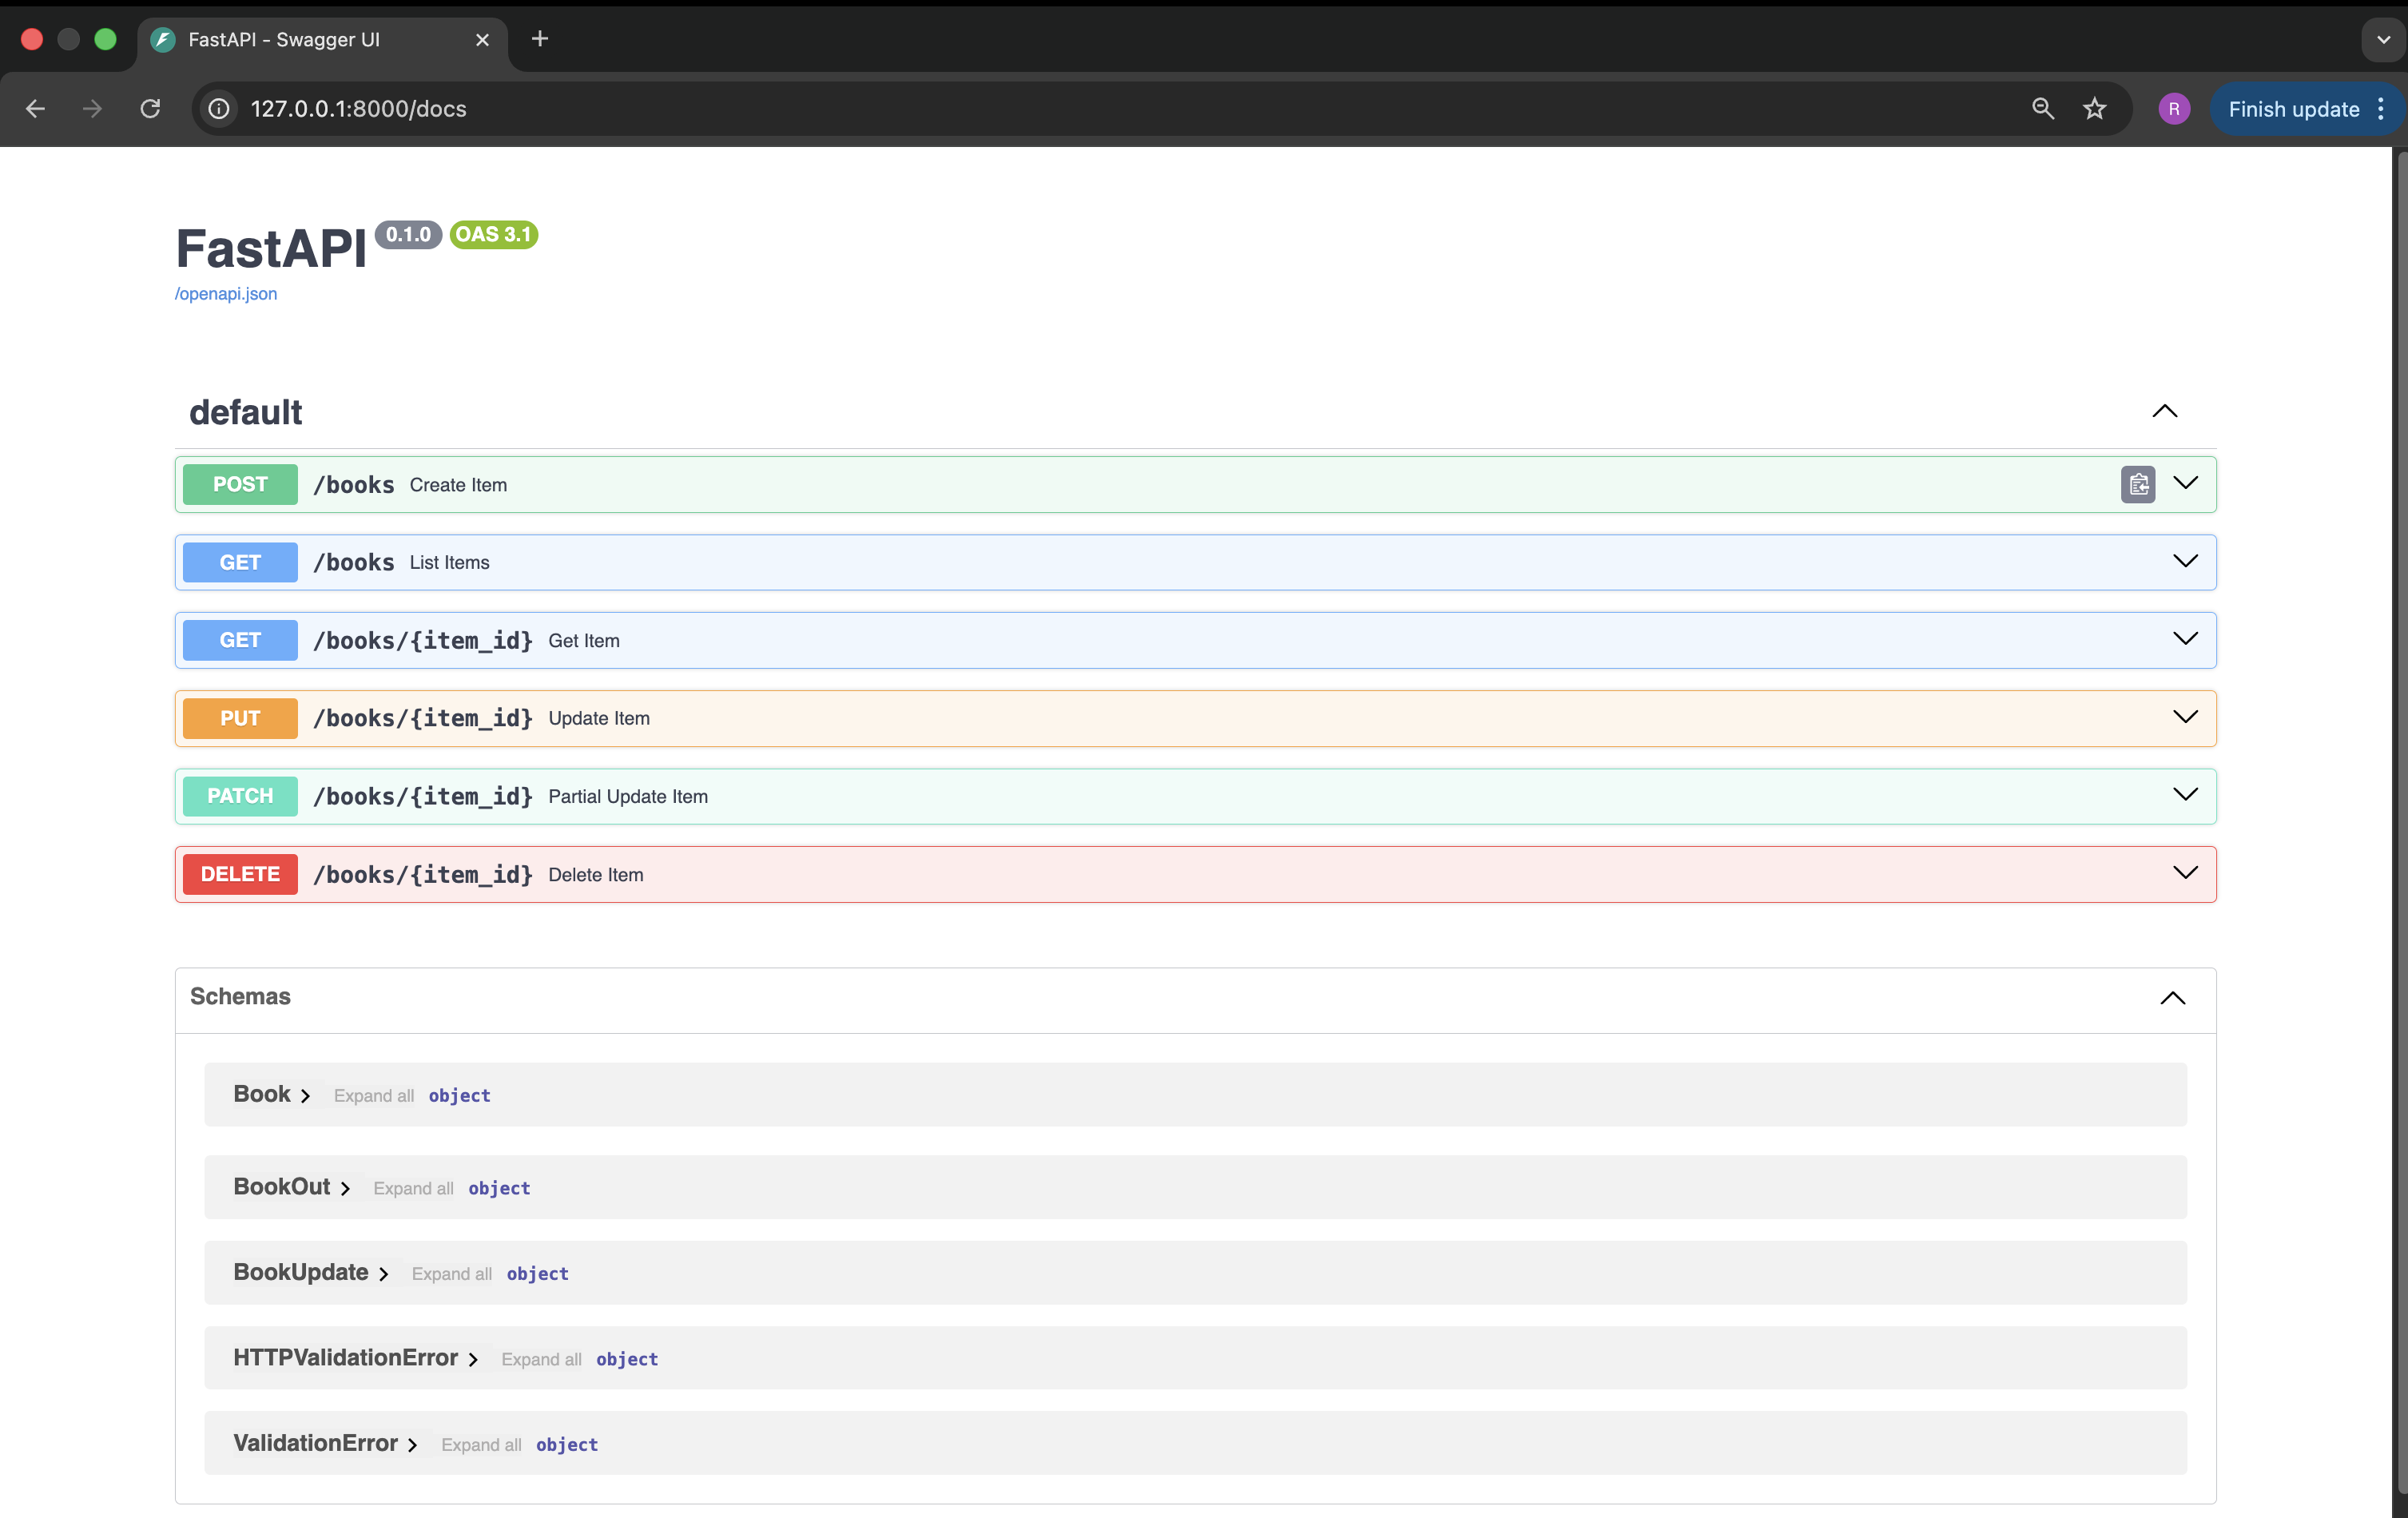
9. Open “http://127.0.0.1:8000/docs” in the browser</h4>

<p><img src="/assets/images/fastapi/fastapi_homepage.png" alt="fastAPI_Homepage" /></p>

<h4 id="10-create-a-book-item-using-fastapi---swagger-ui">
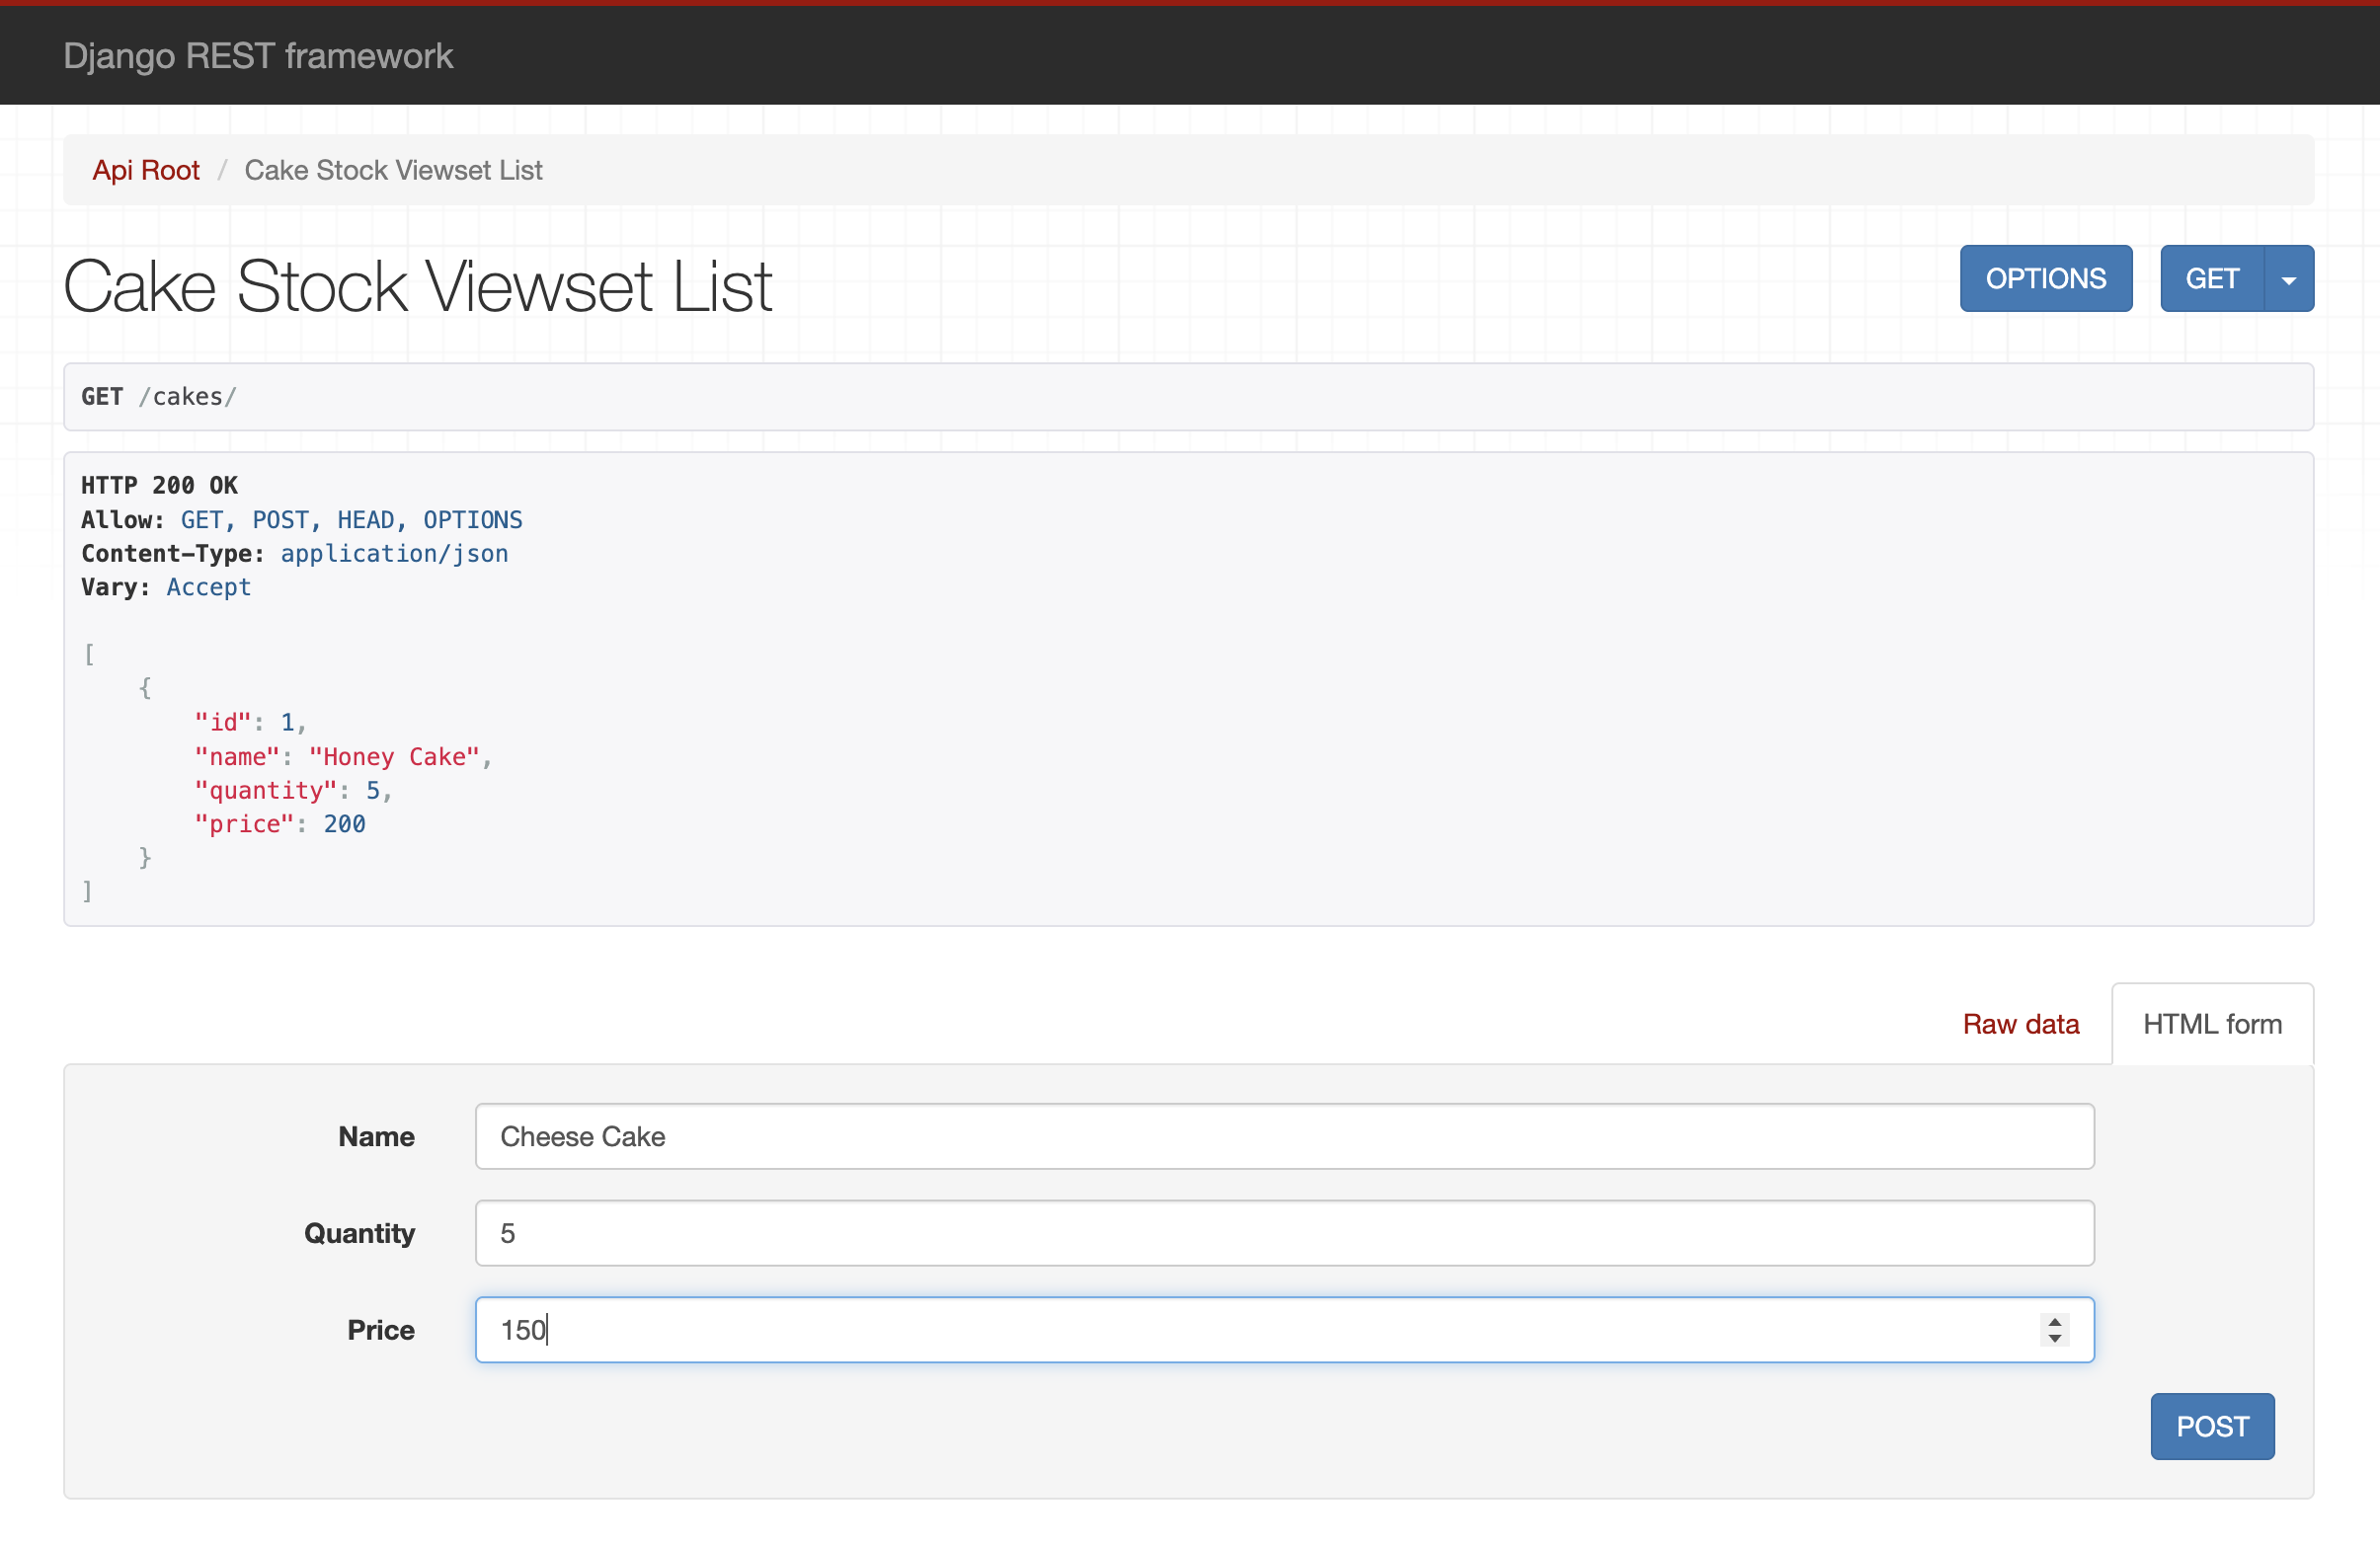
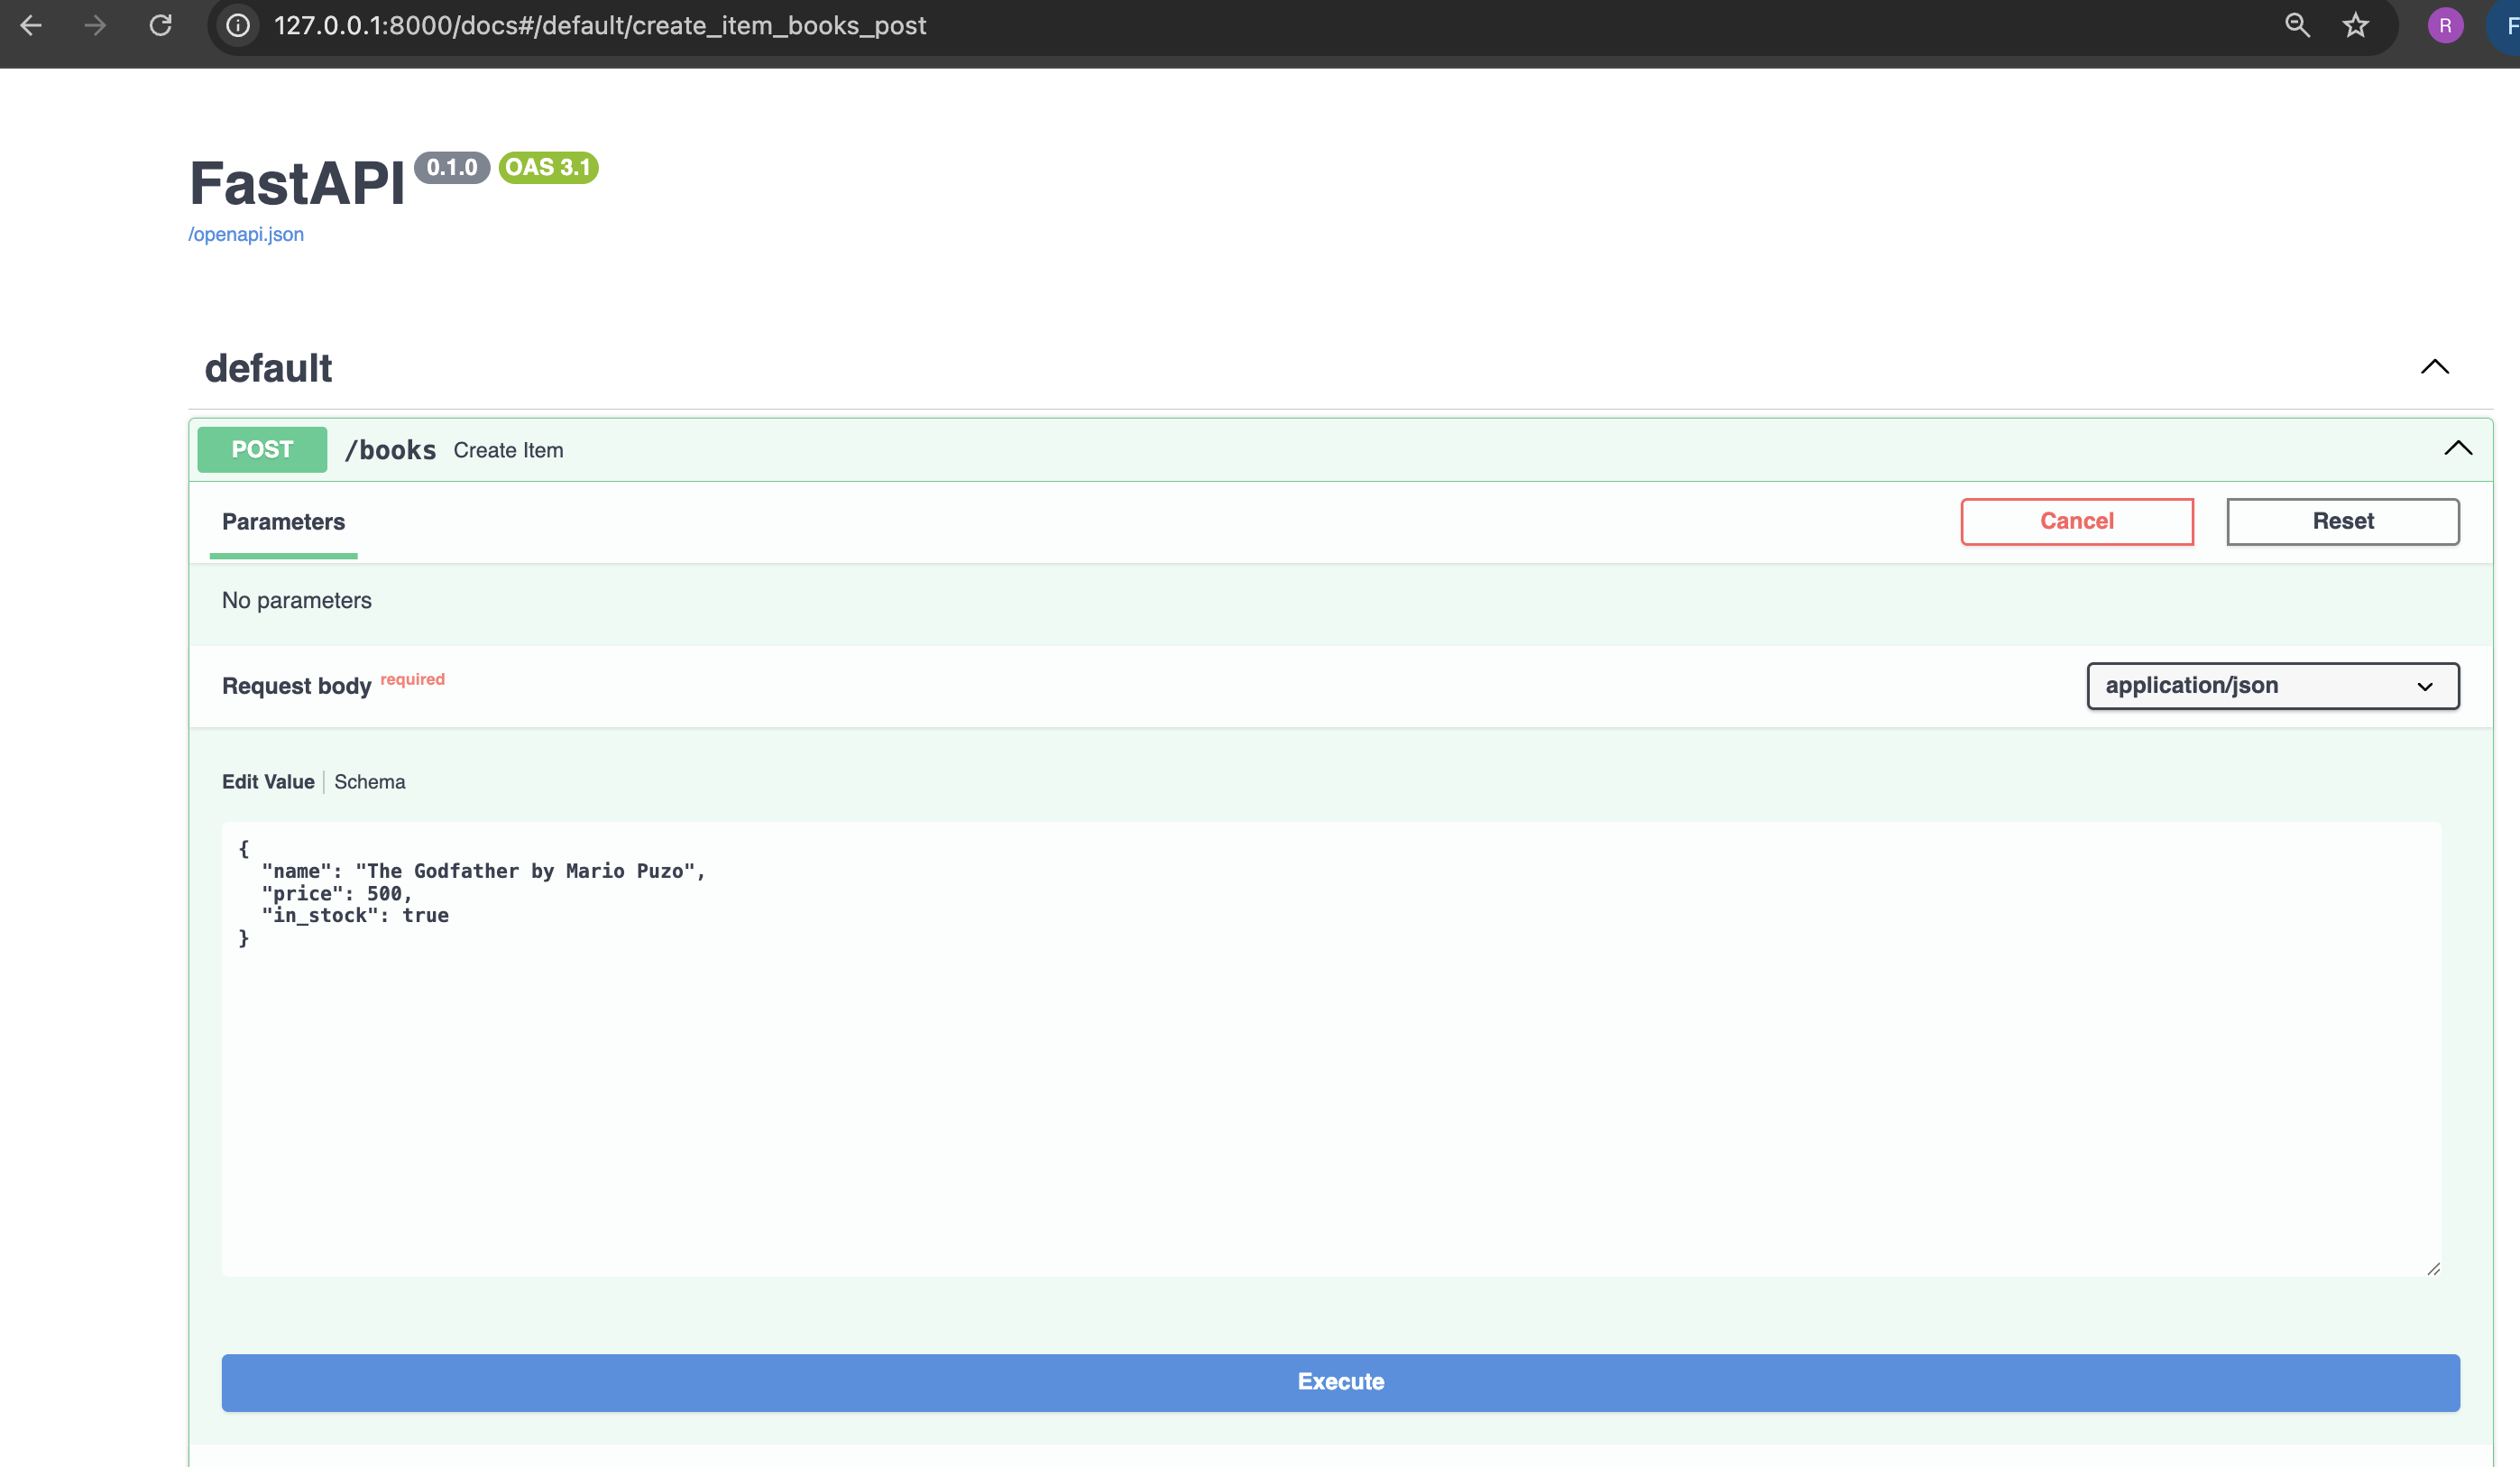
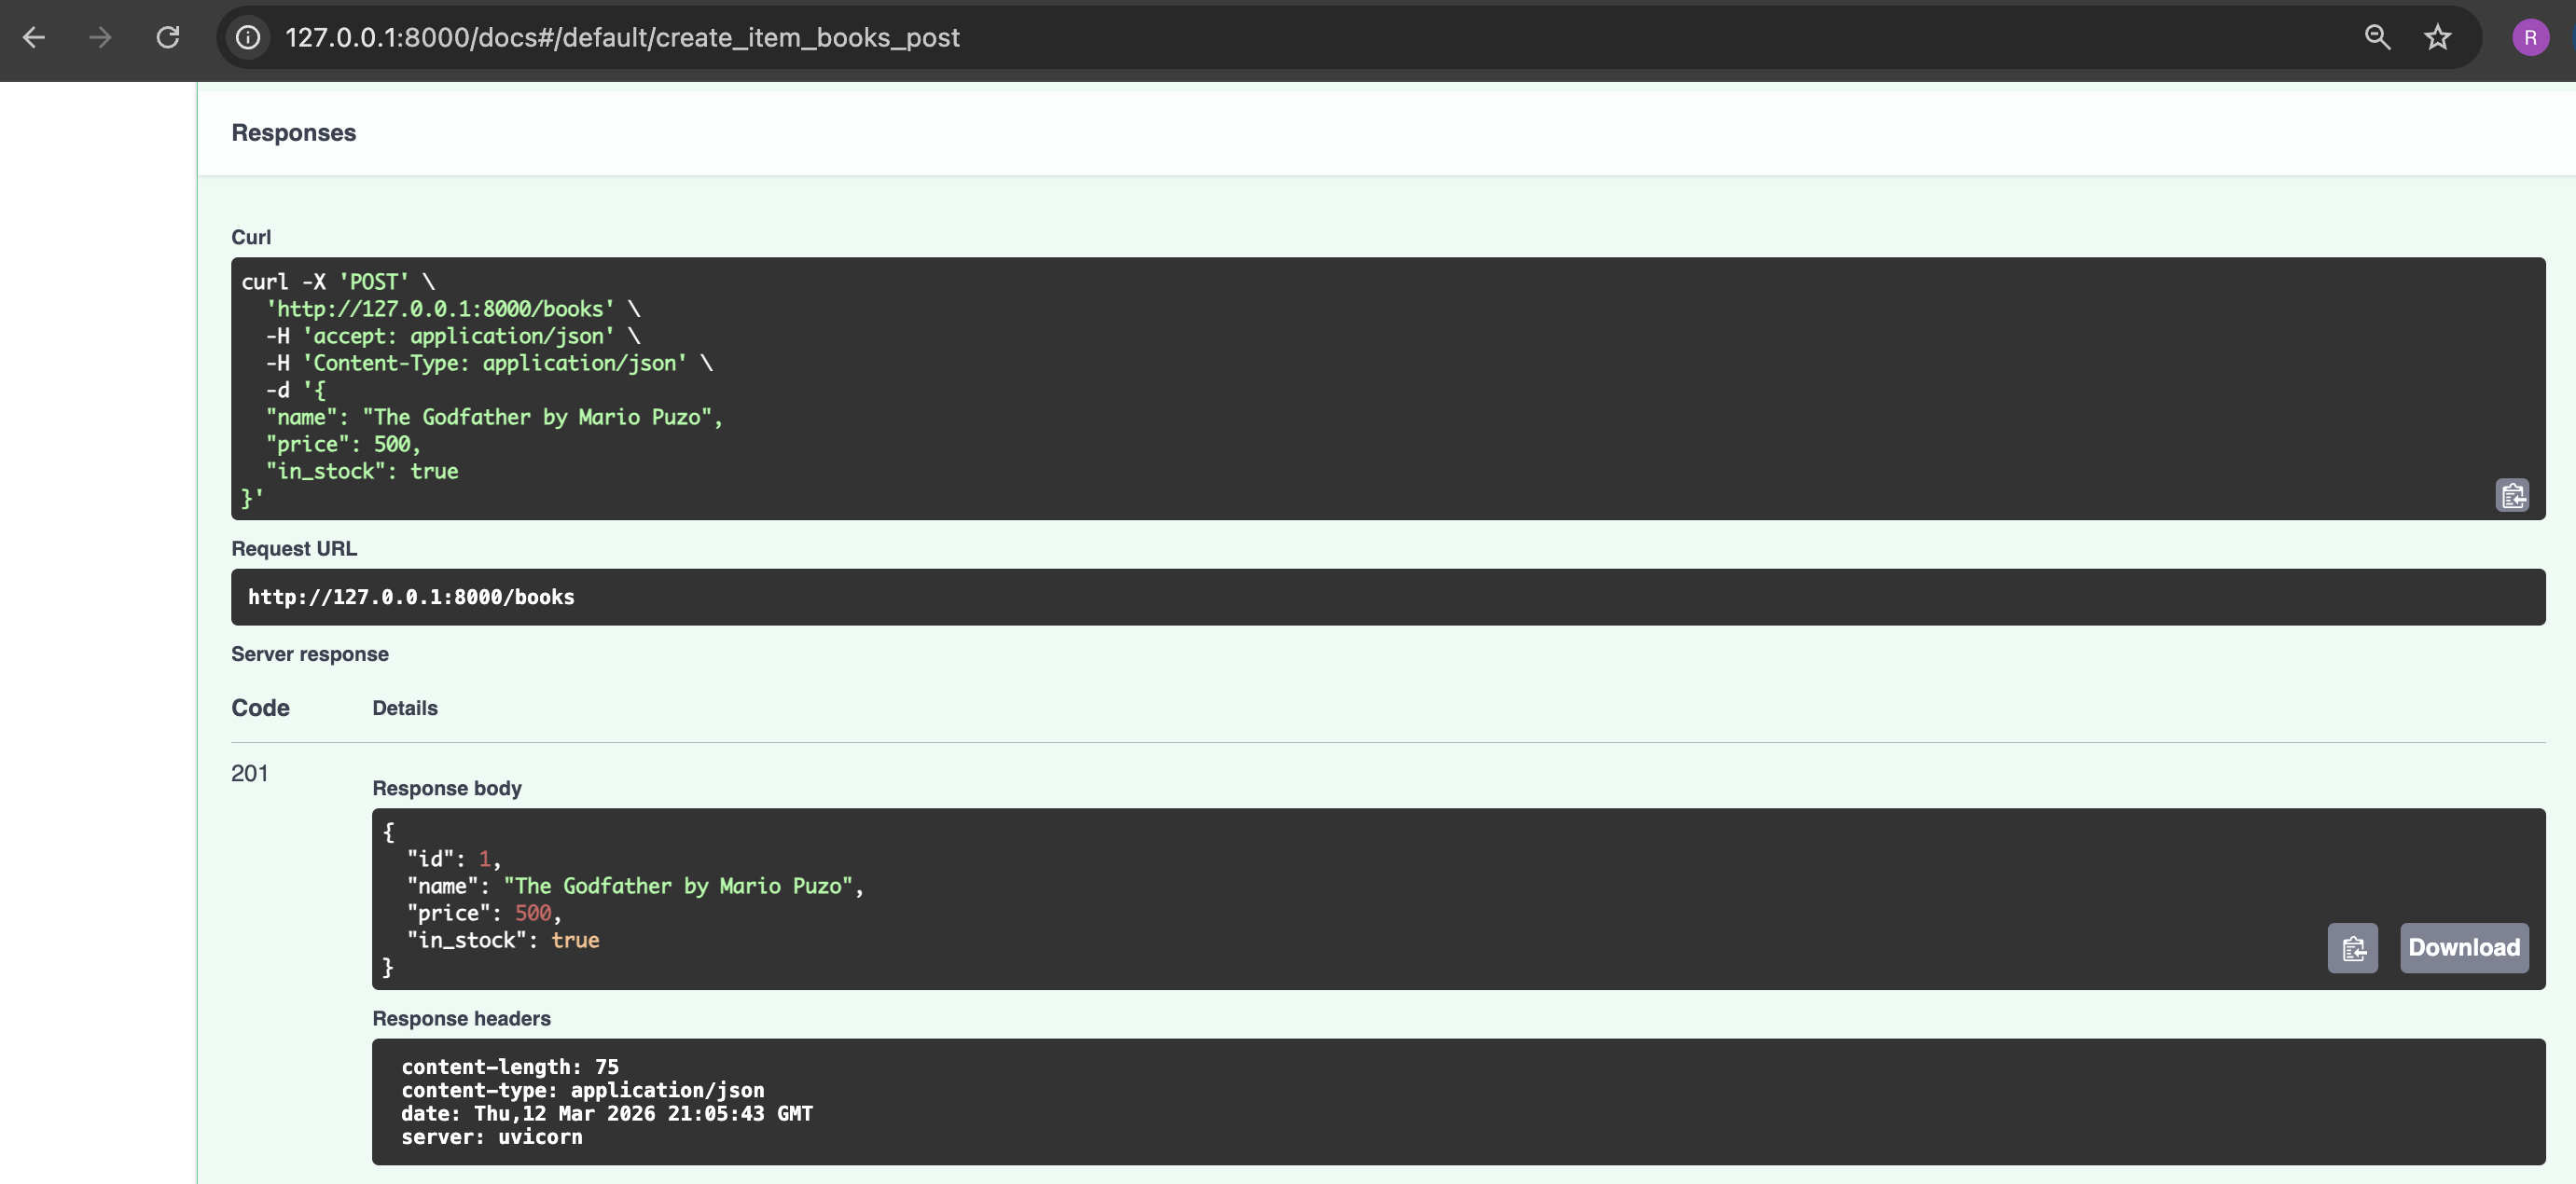
10. Create a book item using FastAPI - Swagger UI</h4>

<p><img src="/assets/images/fastapi/fastapi_post_request.png" alt="fastAPI_Post Request" /></p>

<p><img src="/assets/images/fastapi/fastapi_post_response.png" alt="fastAPI_Post Response" /></p>

<h4 id="11-list-all-books-in-the-book-store-using-fastapi---swagger-ui">
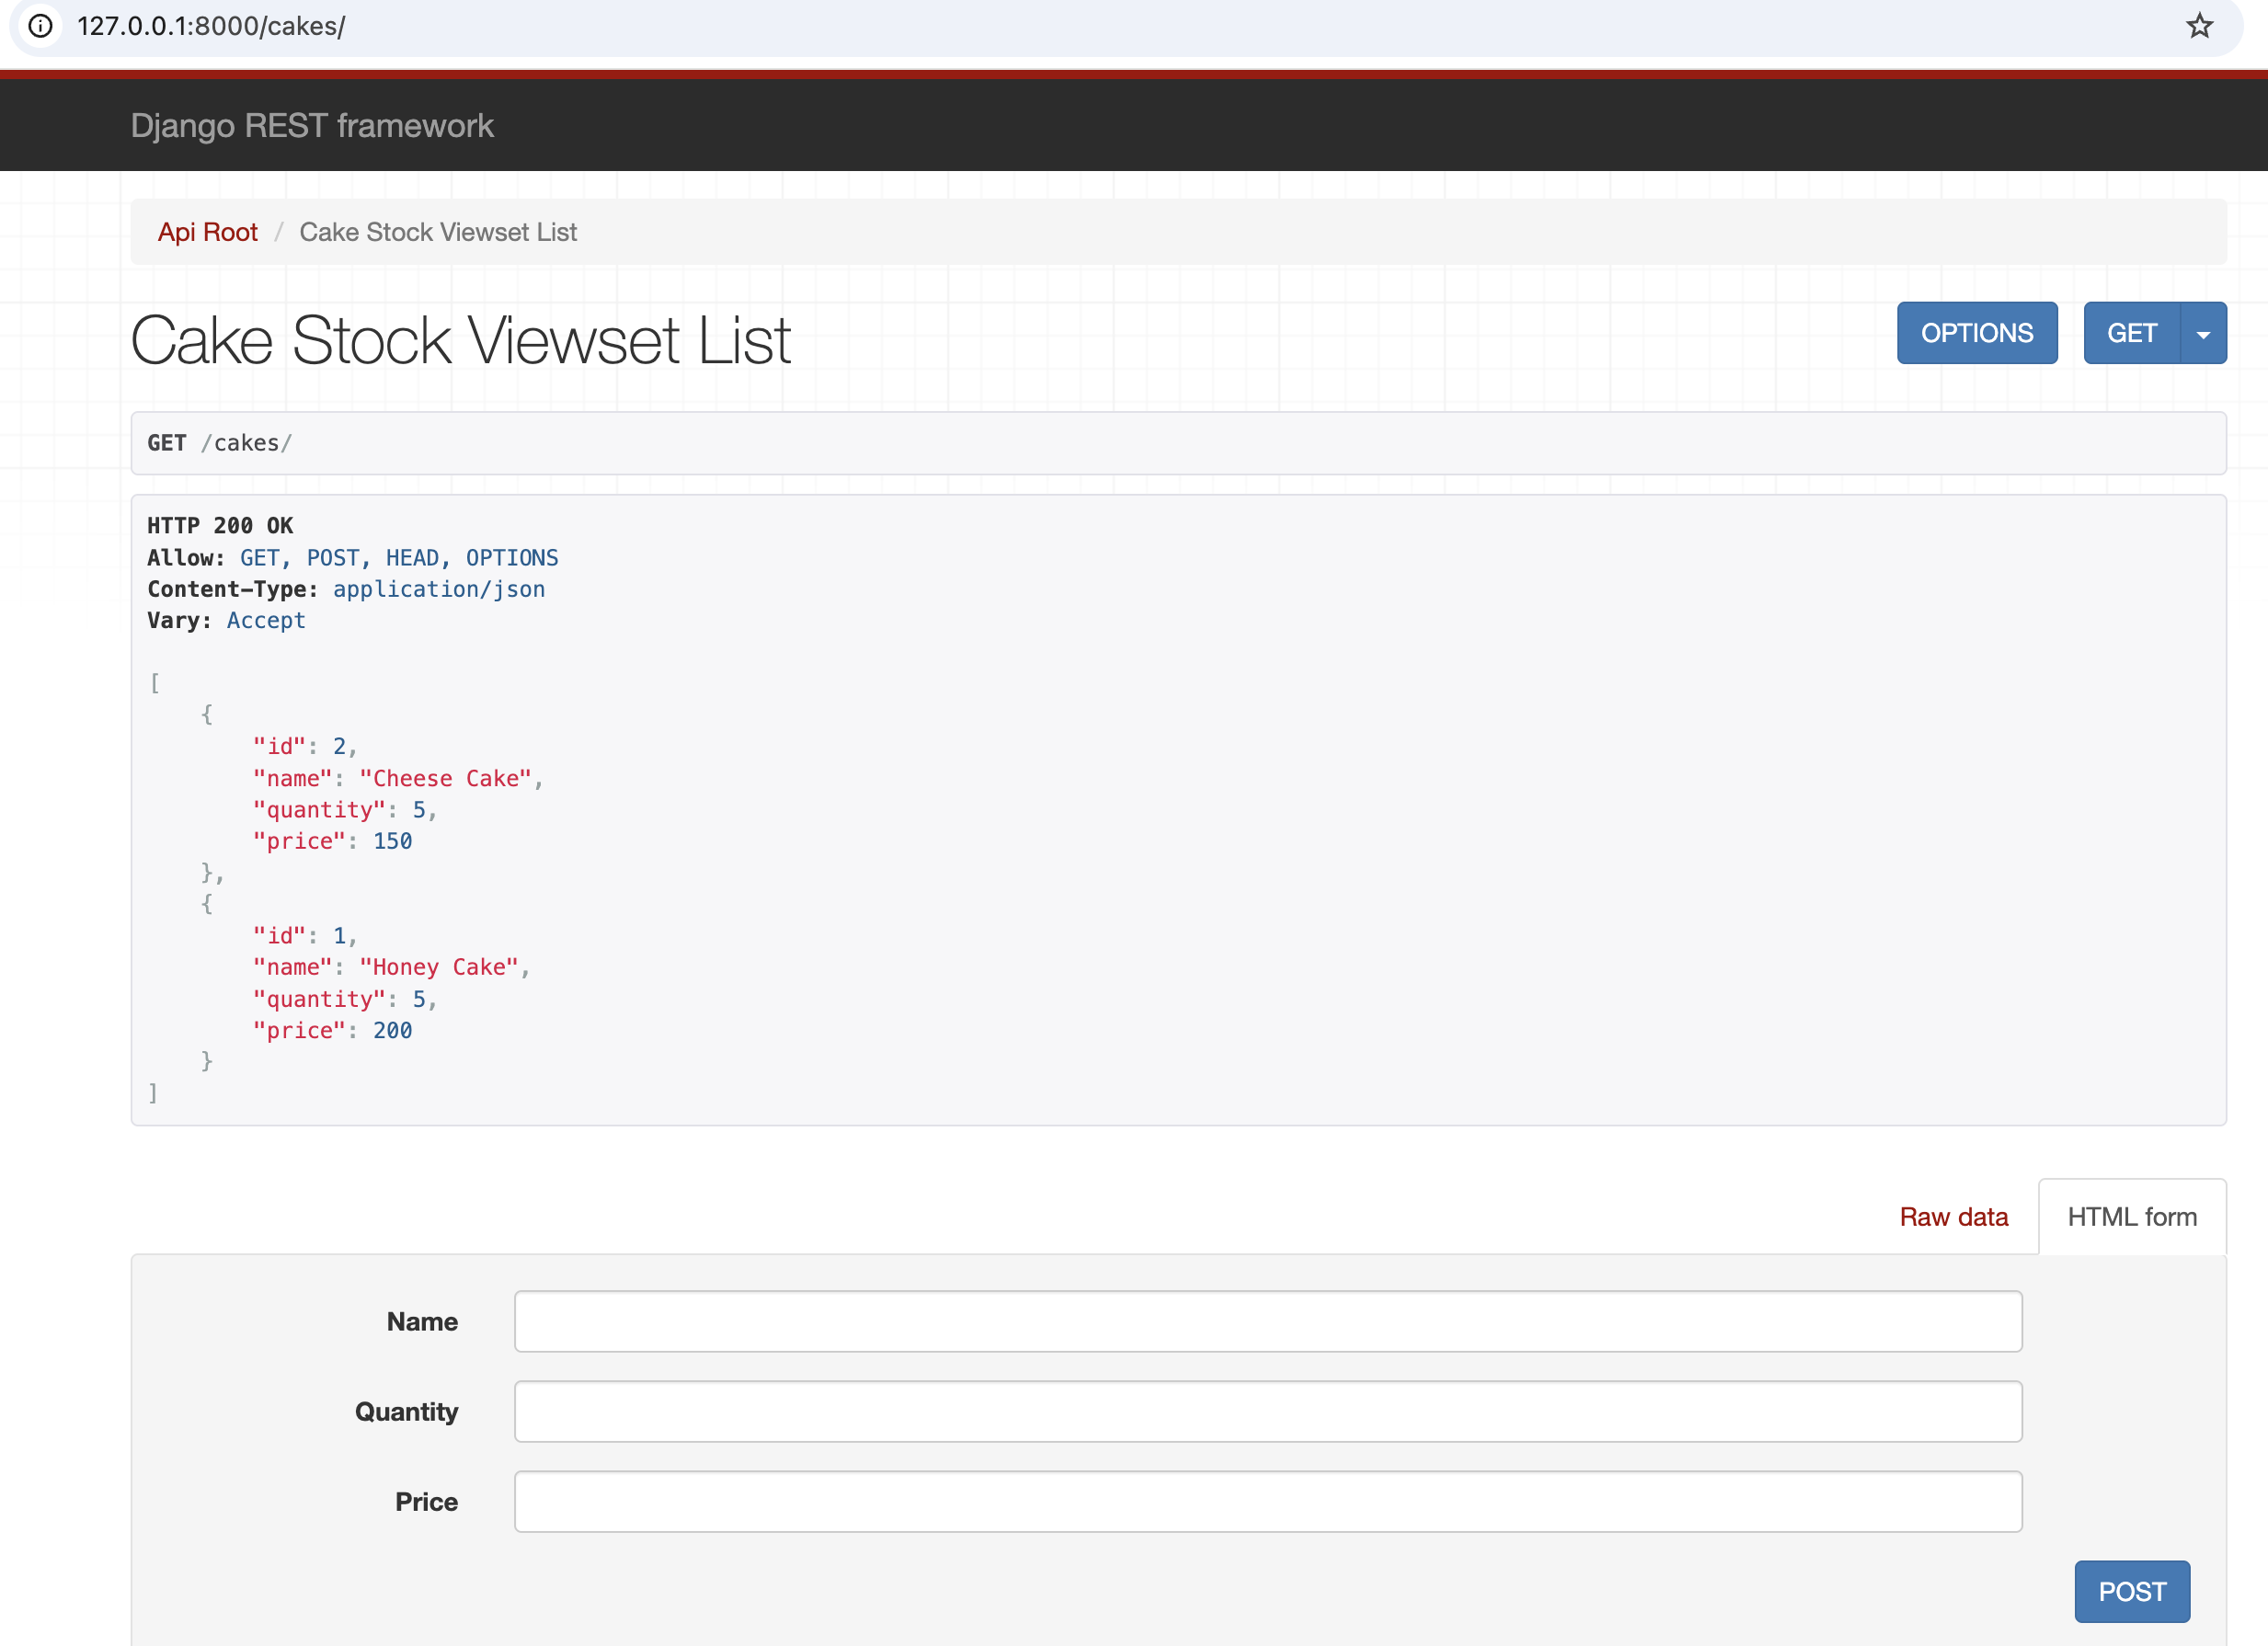
11. List all books in the book store using FastAPI - Swagger UI</h4>

<p><img src="/assets/images/fastapi/fastapi_get_request_response.png" alt="fastAPI_get request response" /></p>

<h4 id="12-update-availability-of-a-book-in-the-book-store">
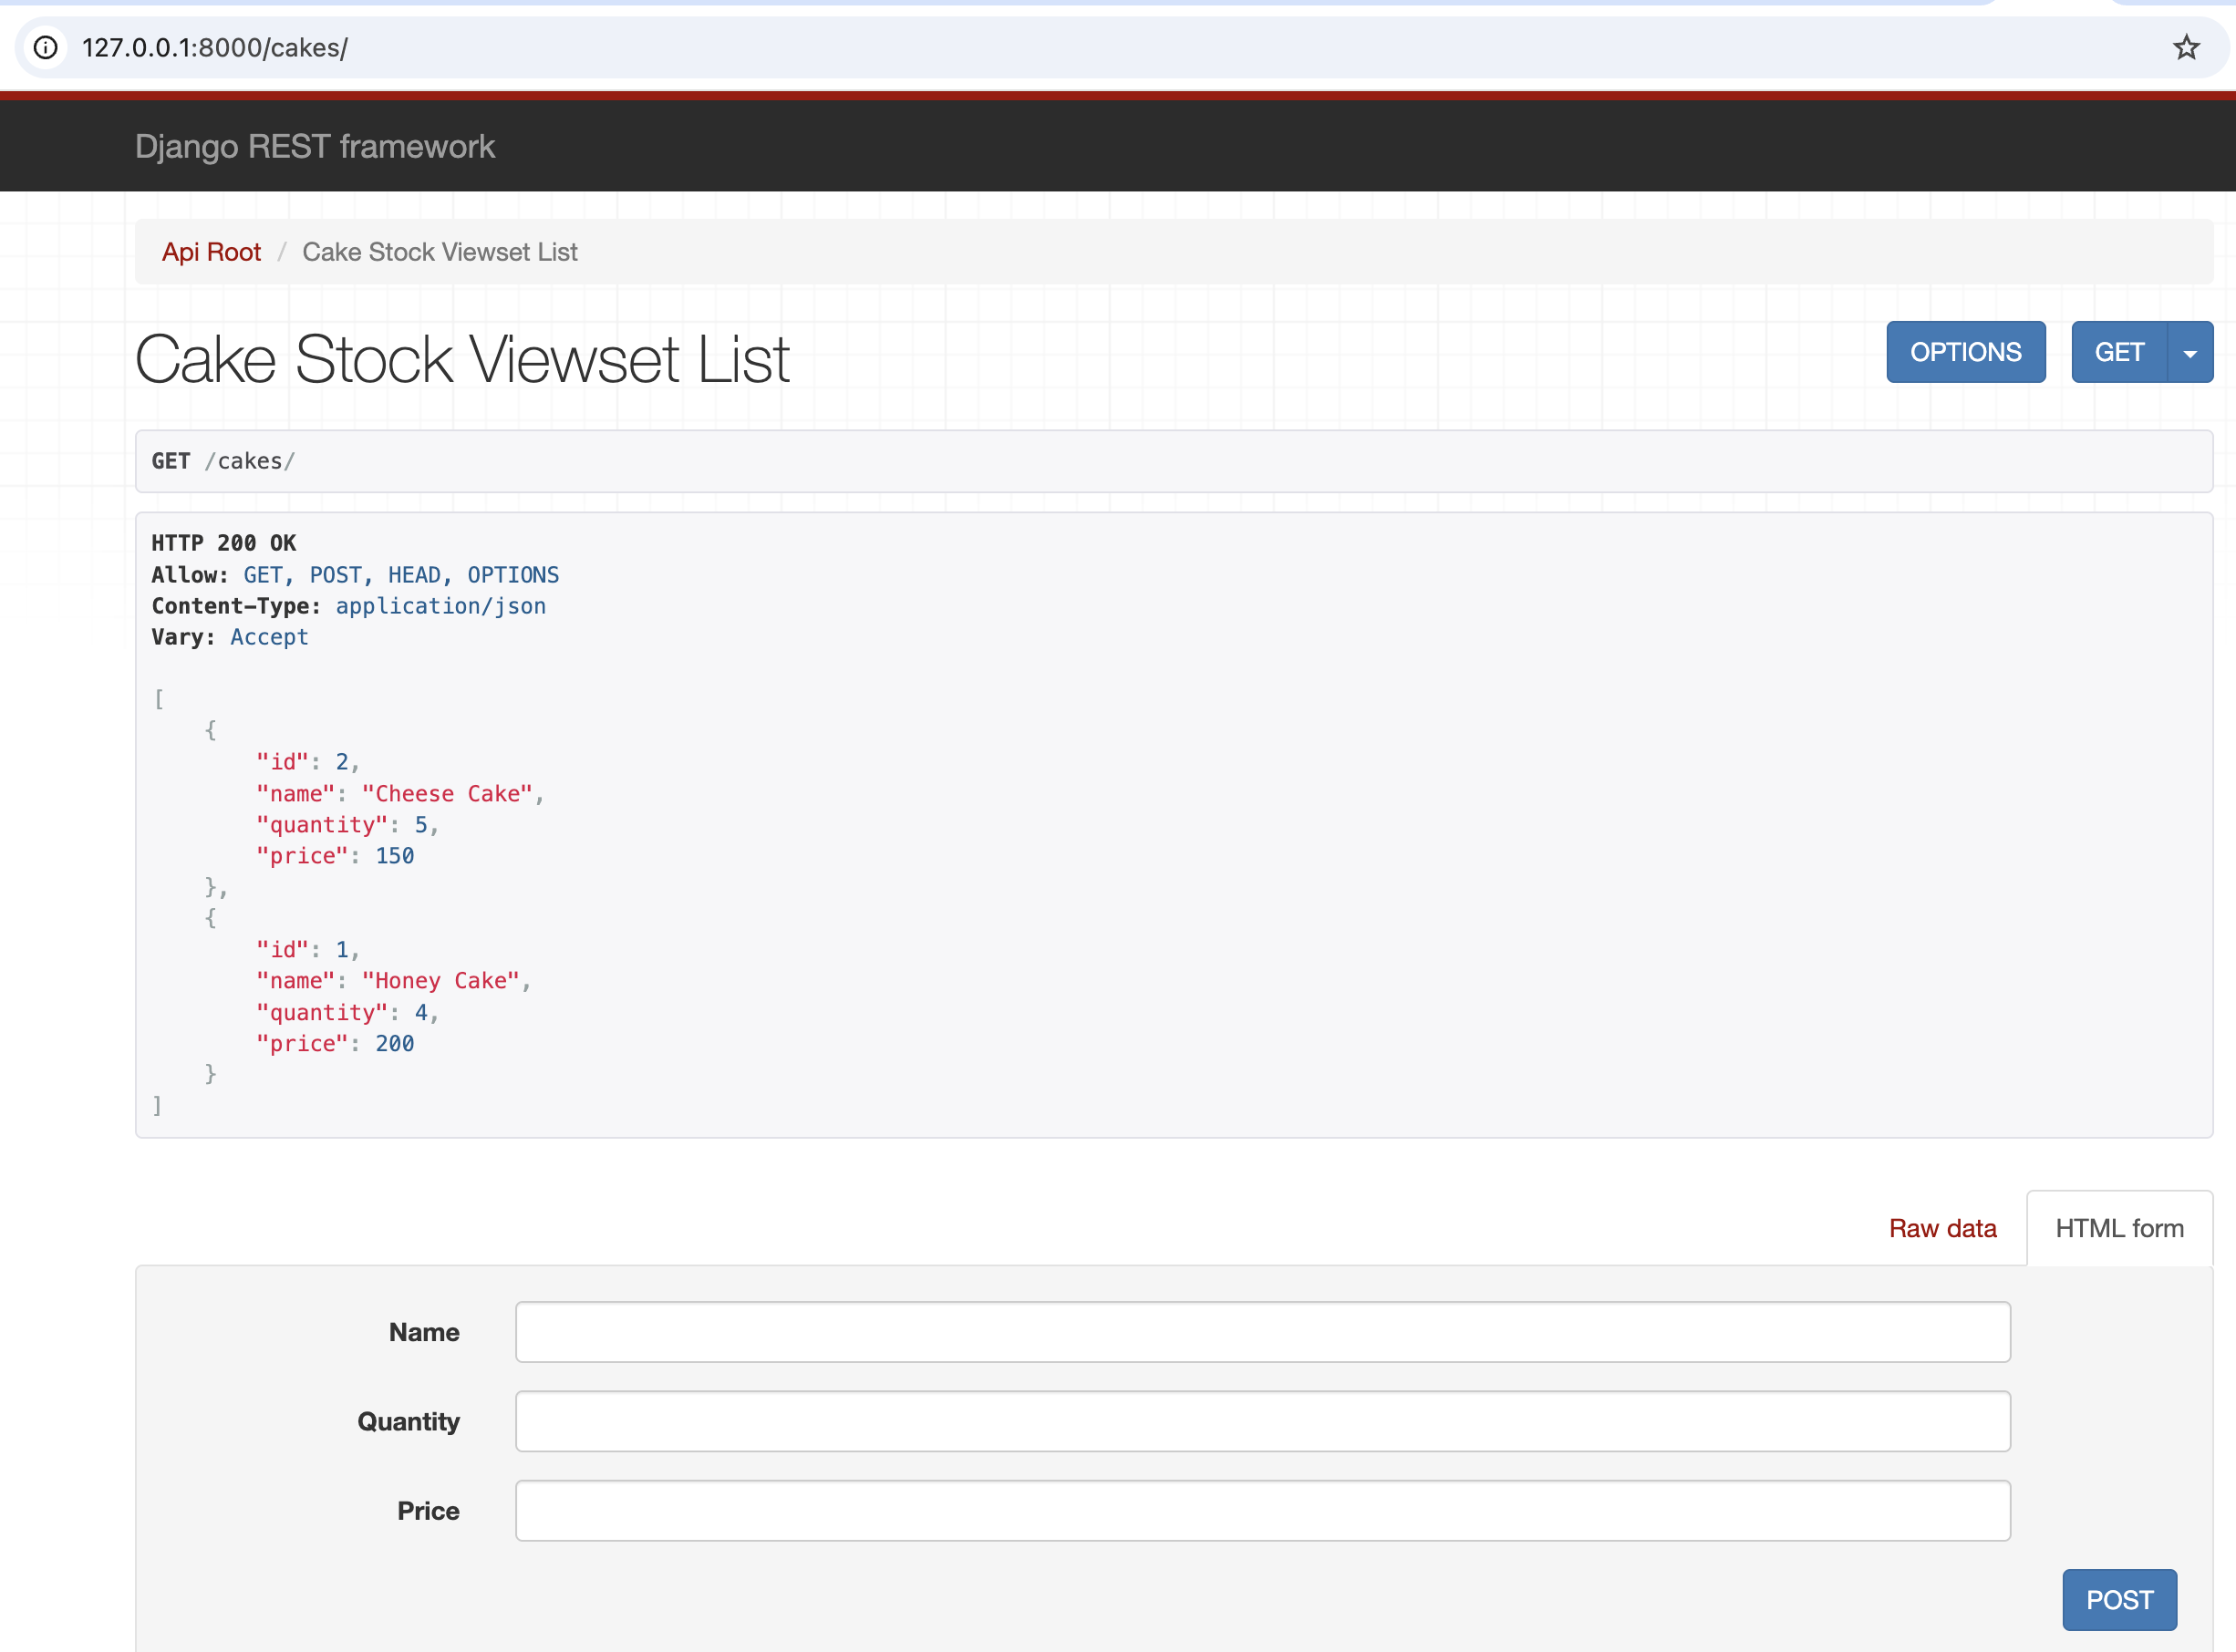
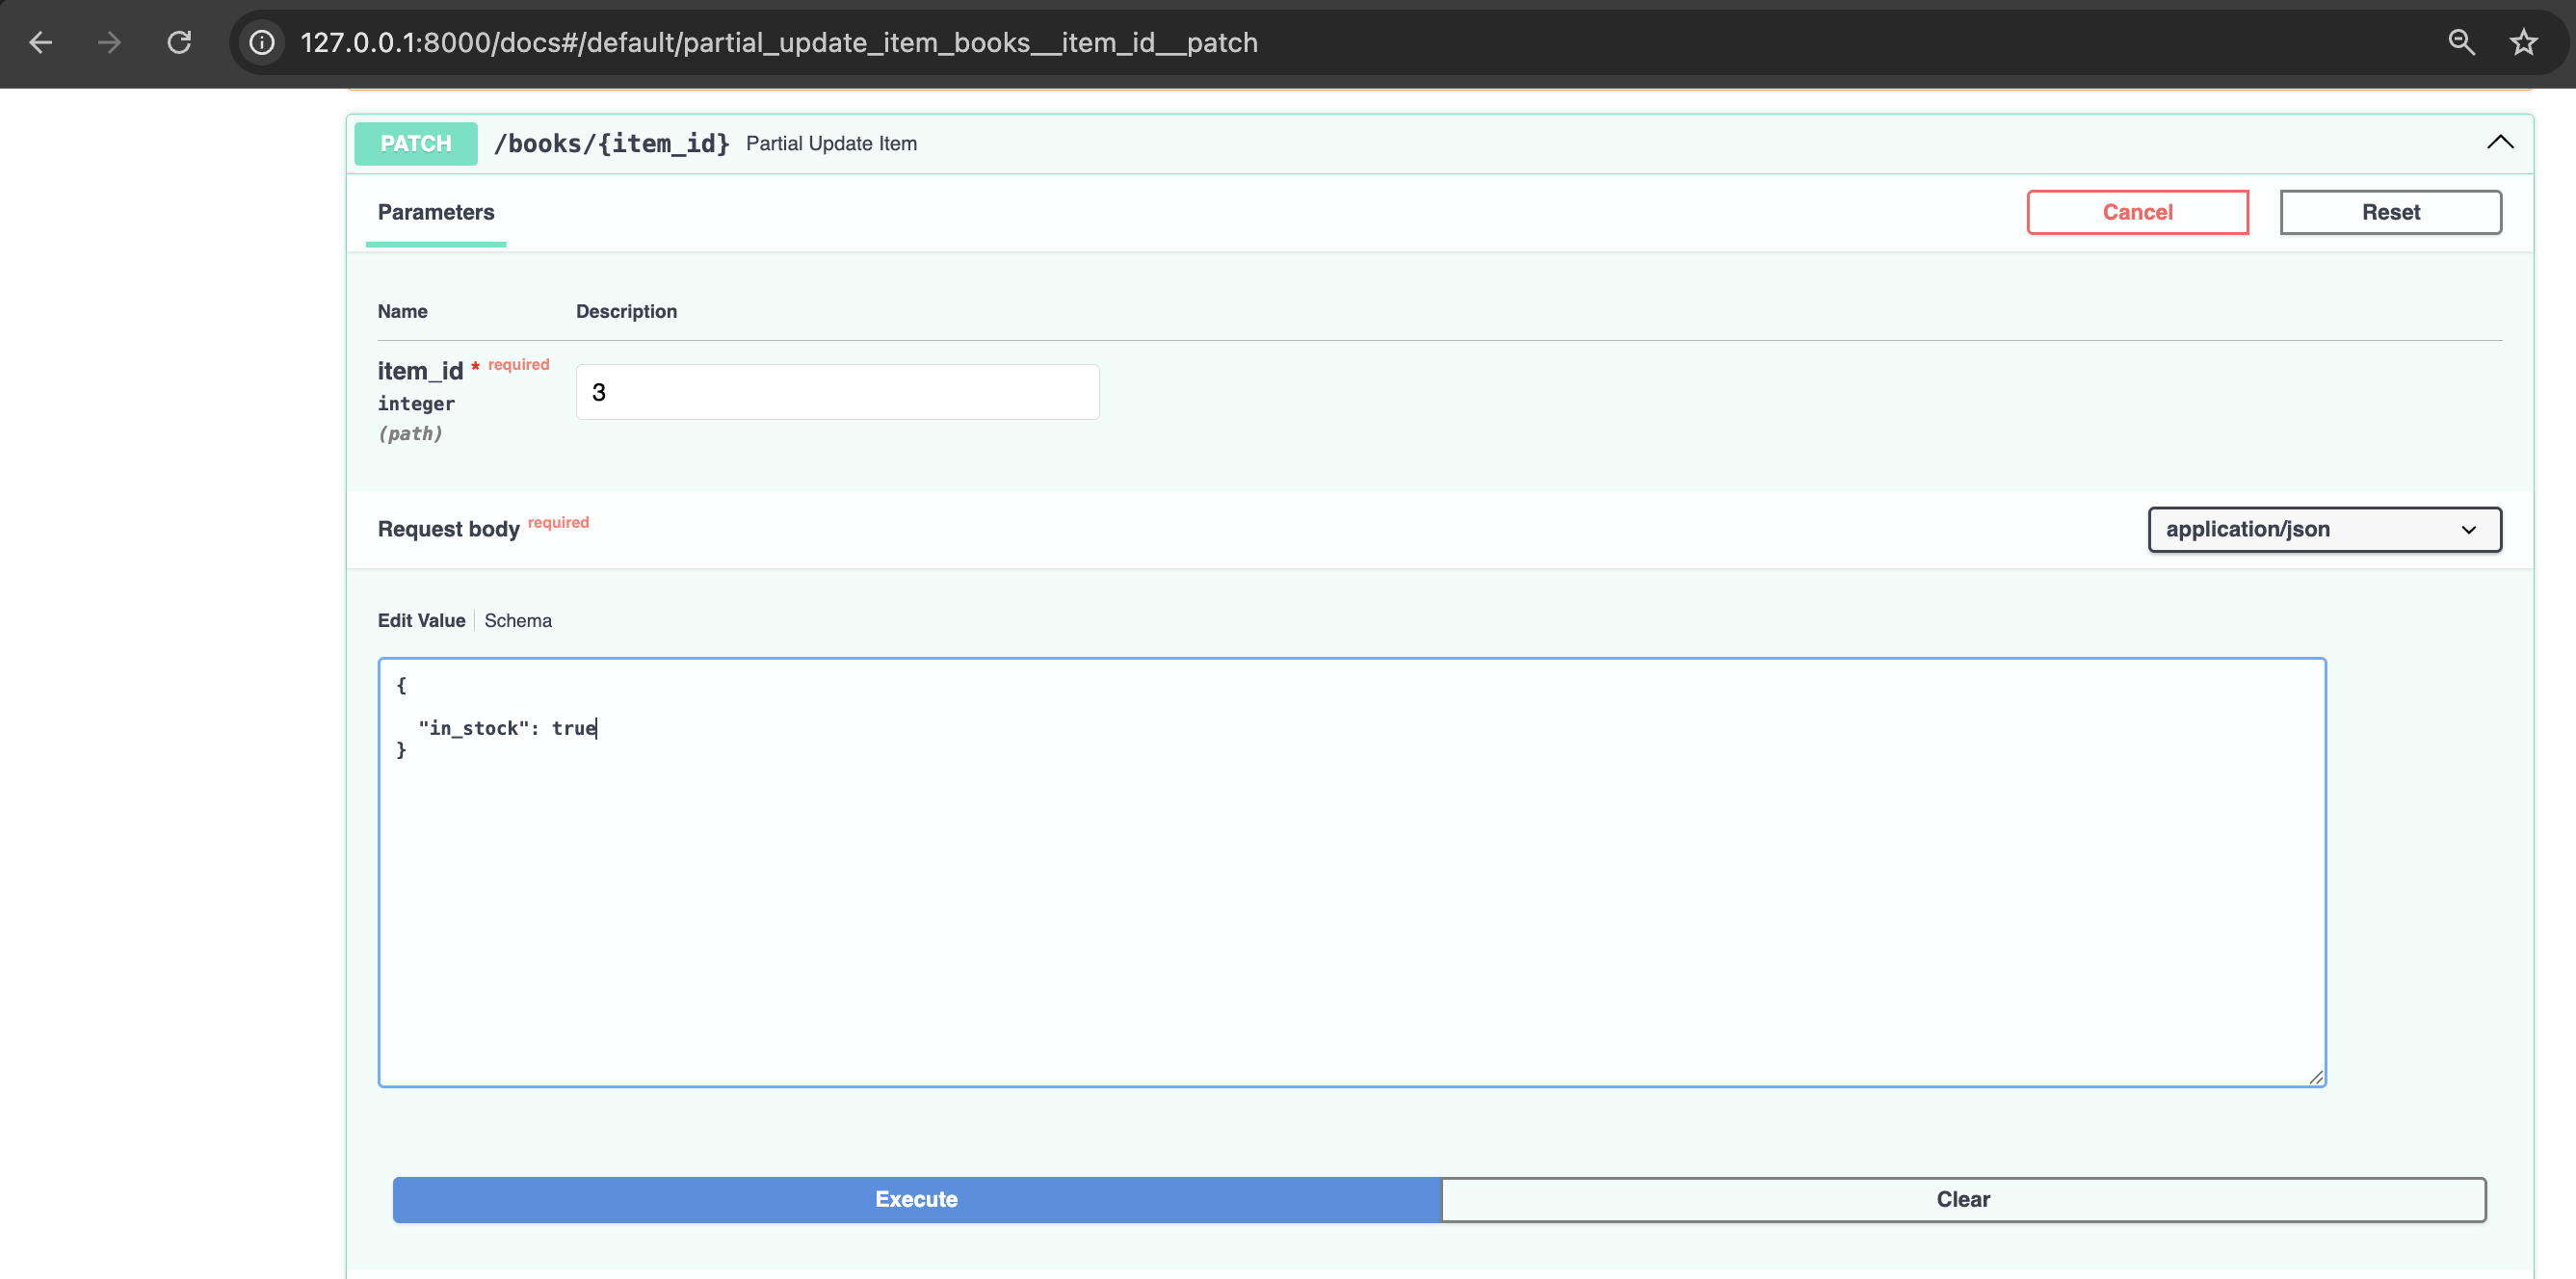
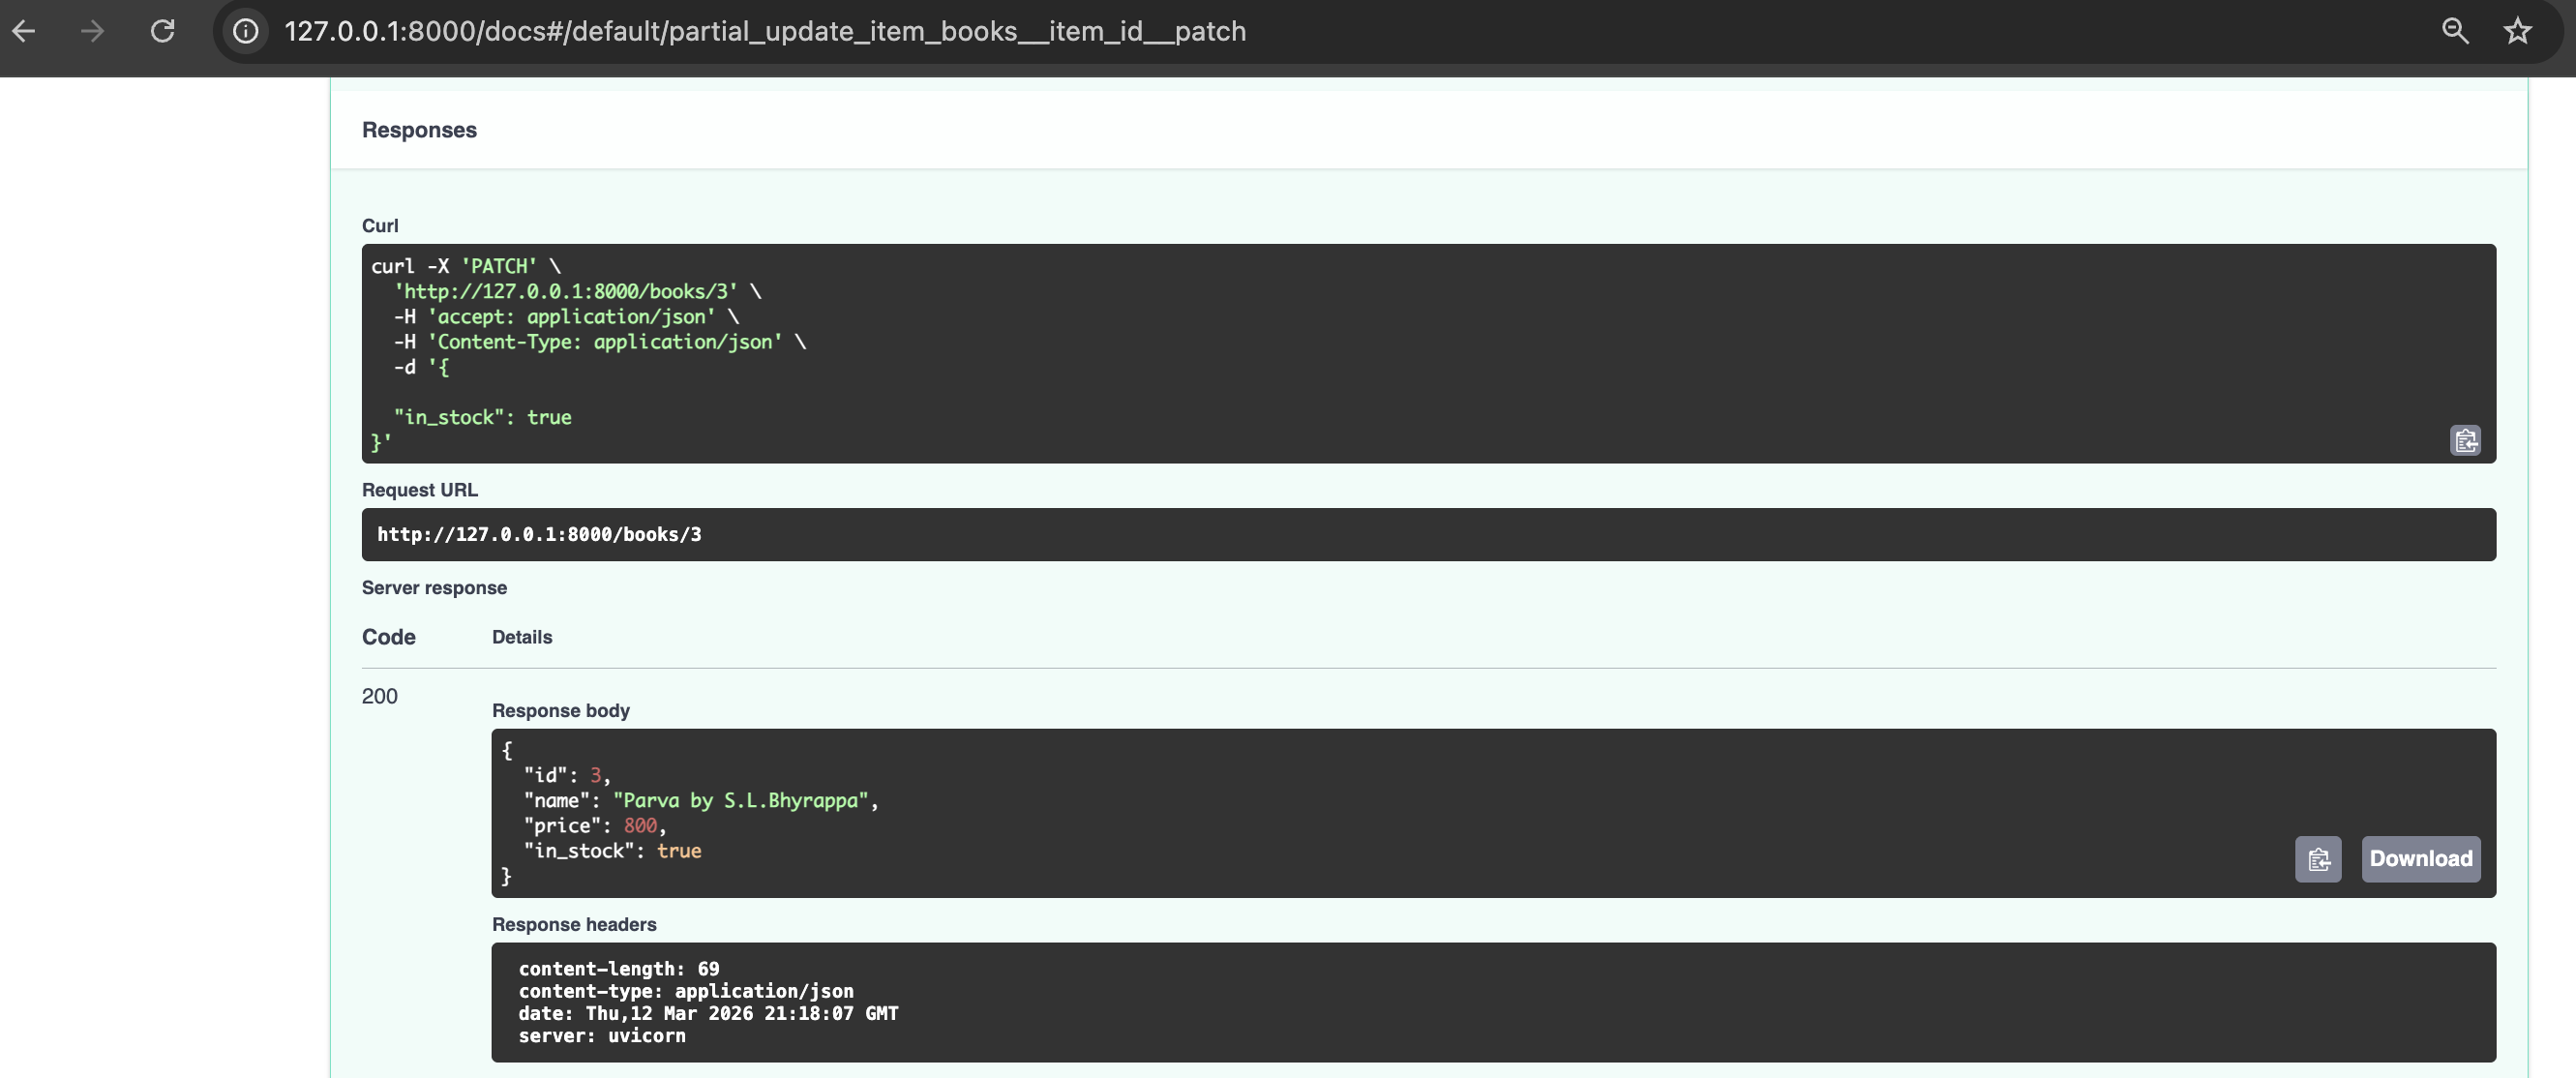
12. Update availability of a book in the book store</h4>

<p><img src="/assets/images/fastapi/fastapi_patch_request.png" alt="fastAPI_patch request" /></p>

<p><img src="/assets/images/fastapi/fastapi_patch_response.png" alt="fastAPI_patch response" /></p>

<h4 id="13-delete-a-book-from-the-book-store">
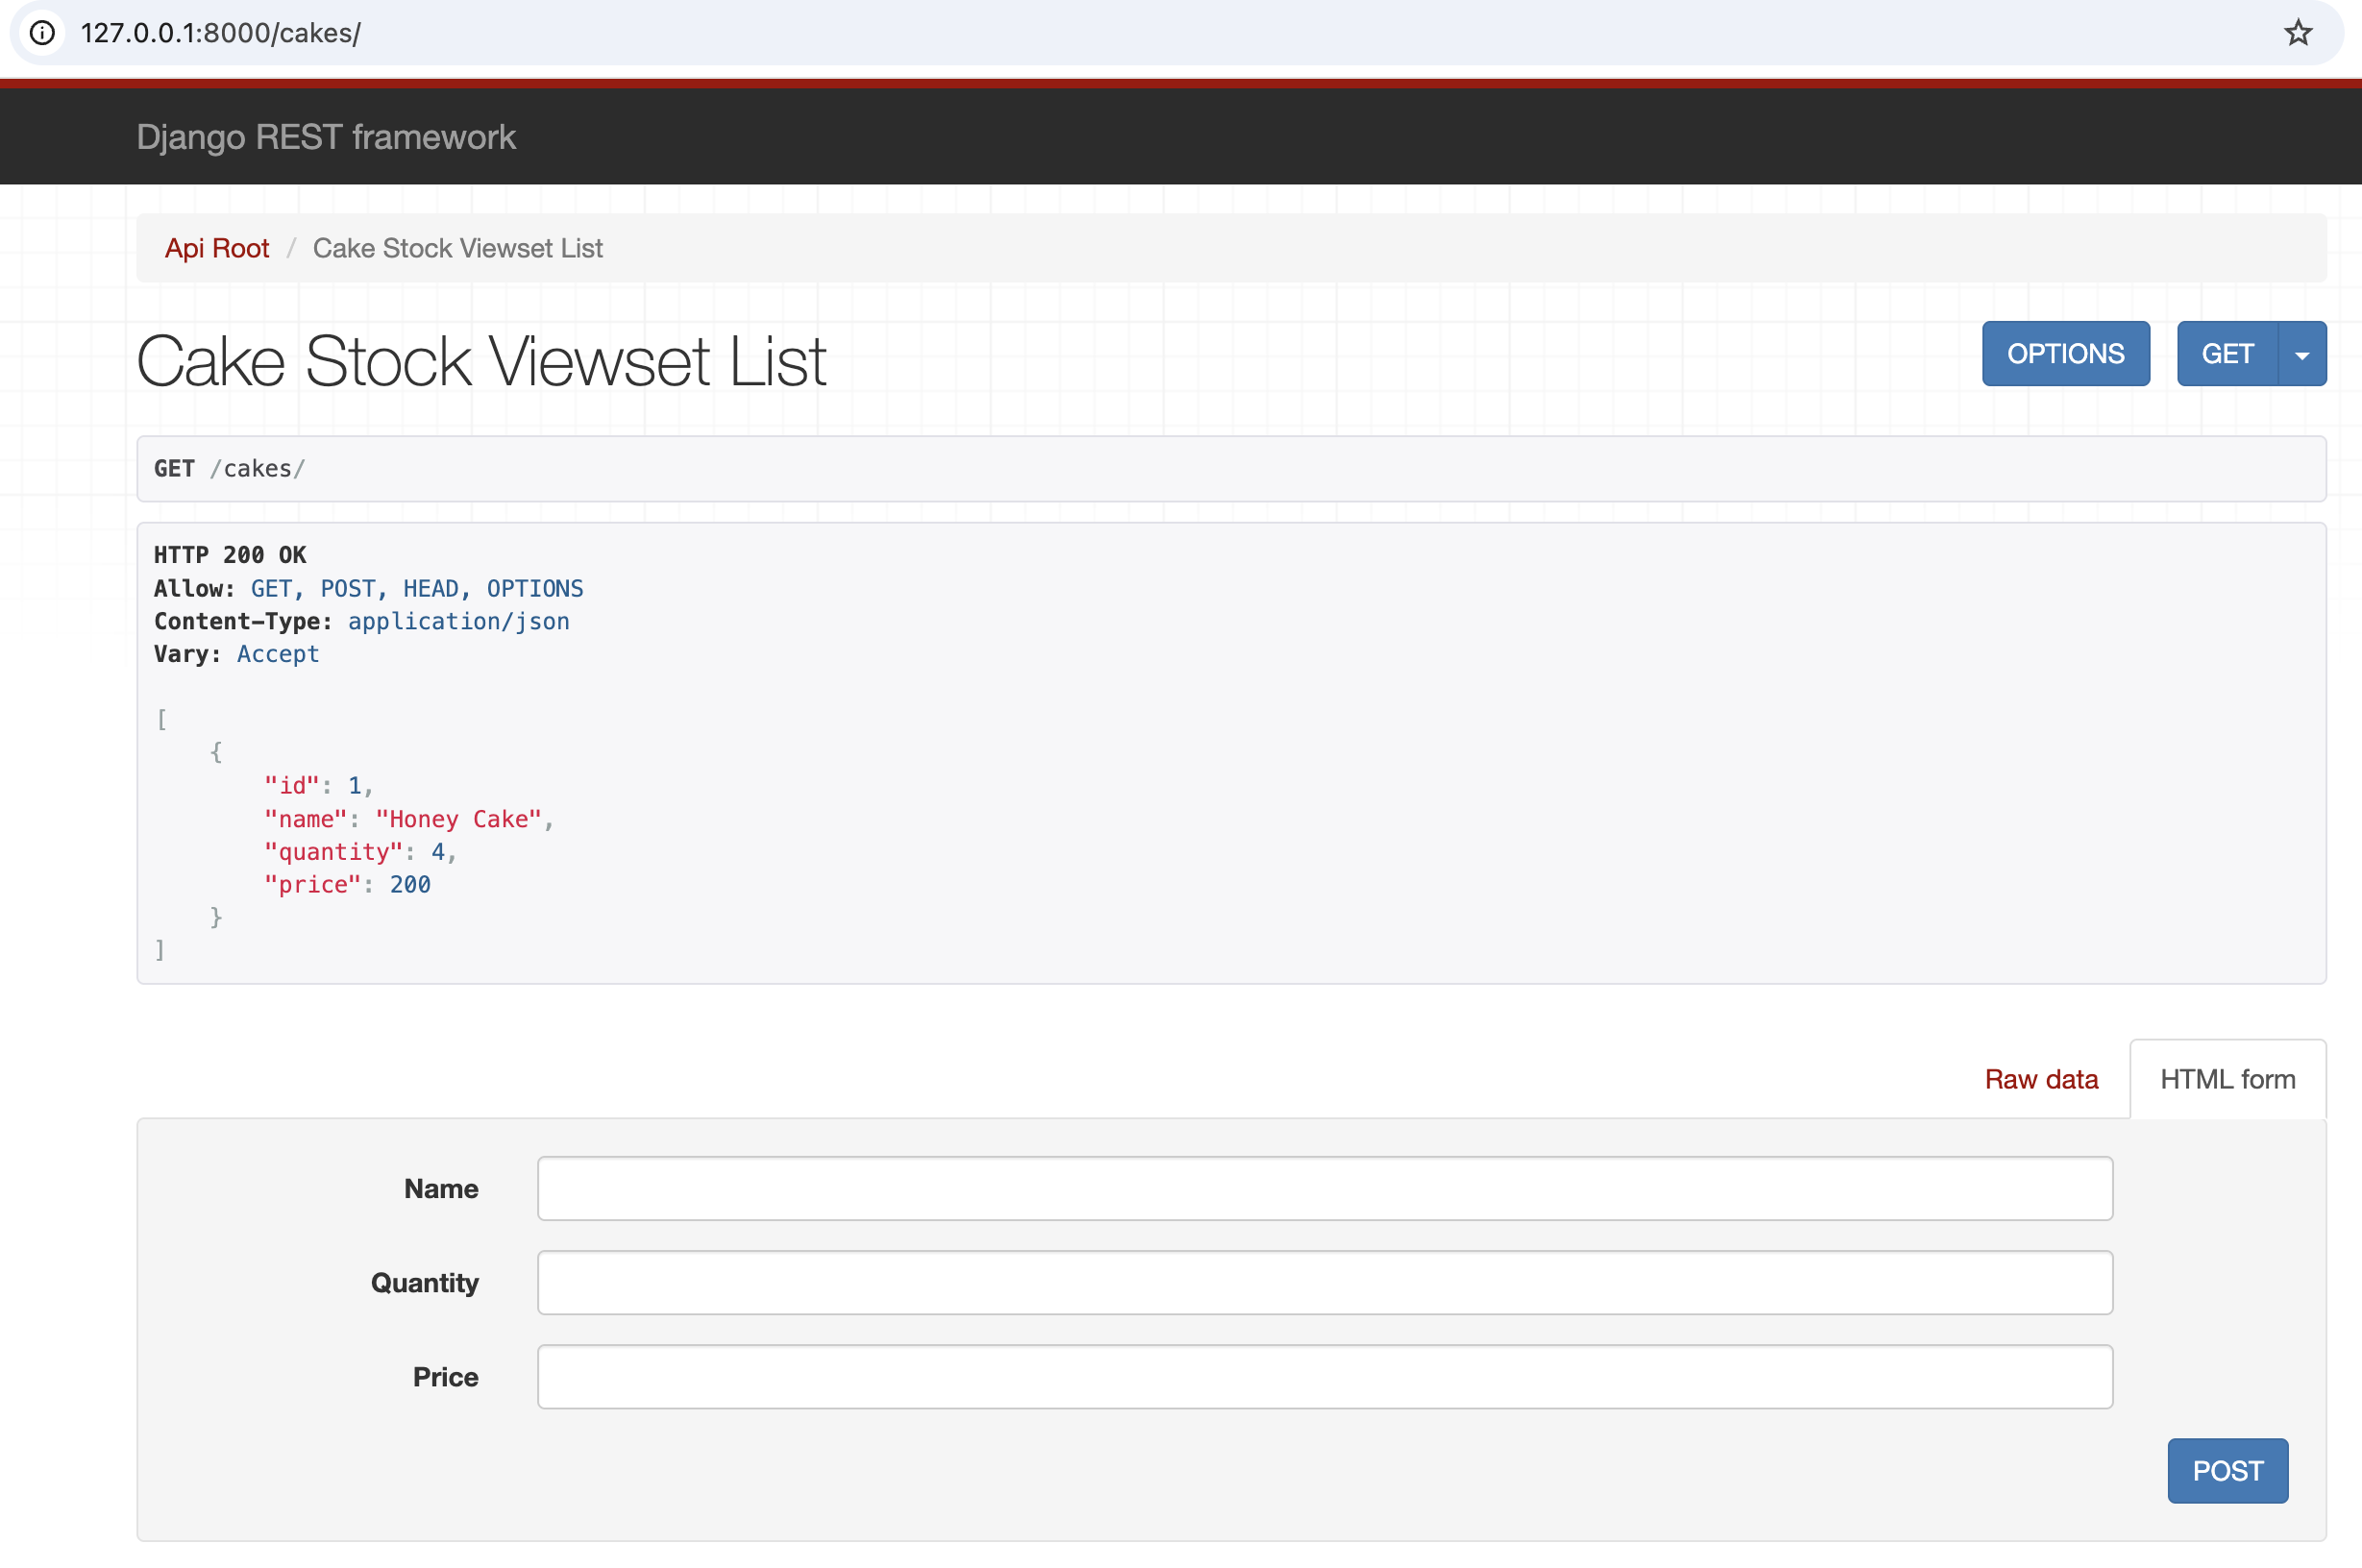
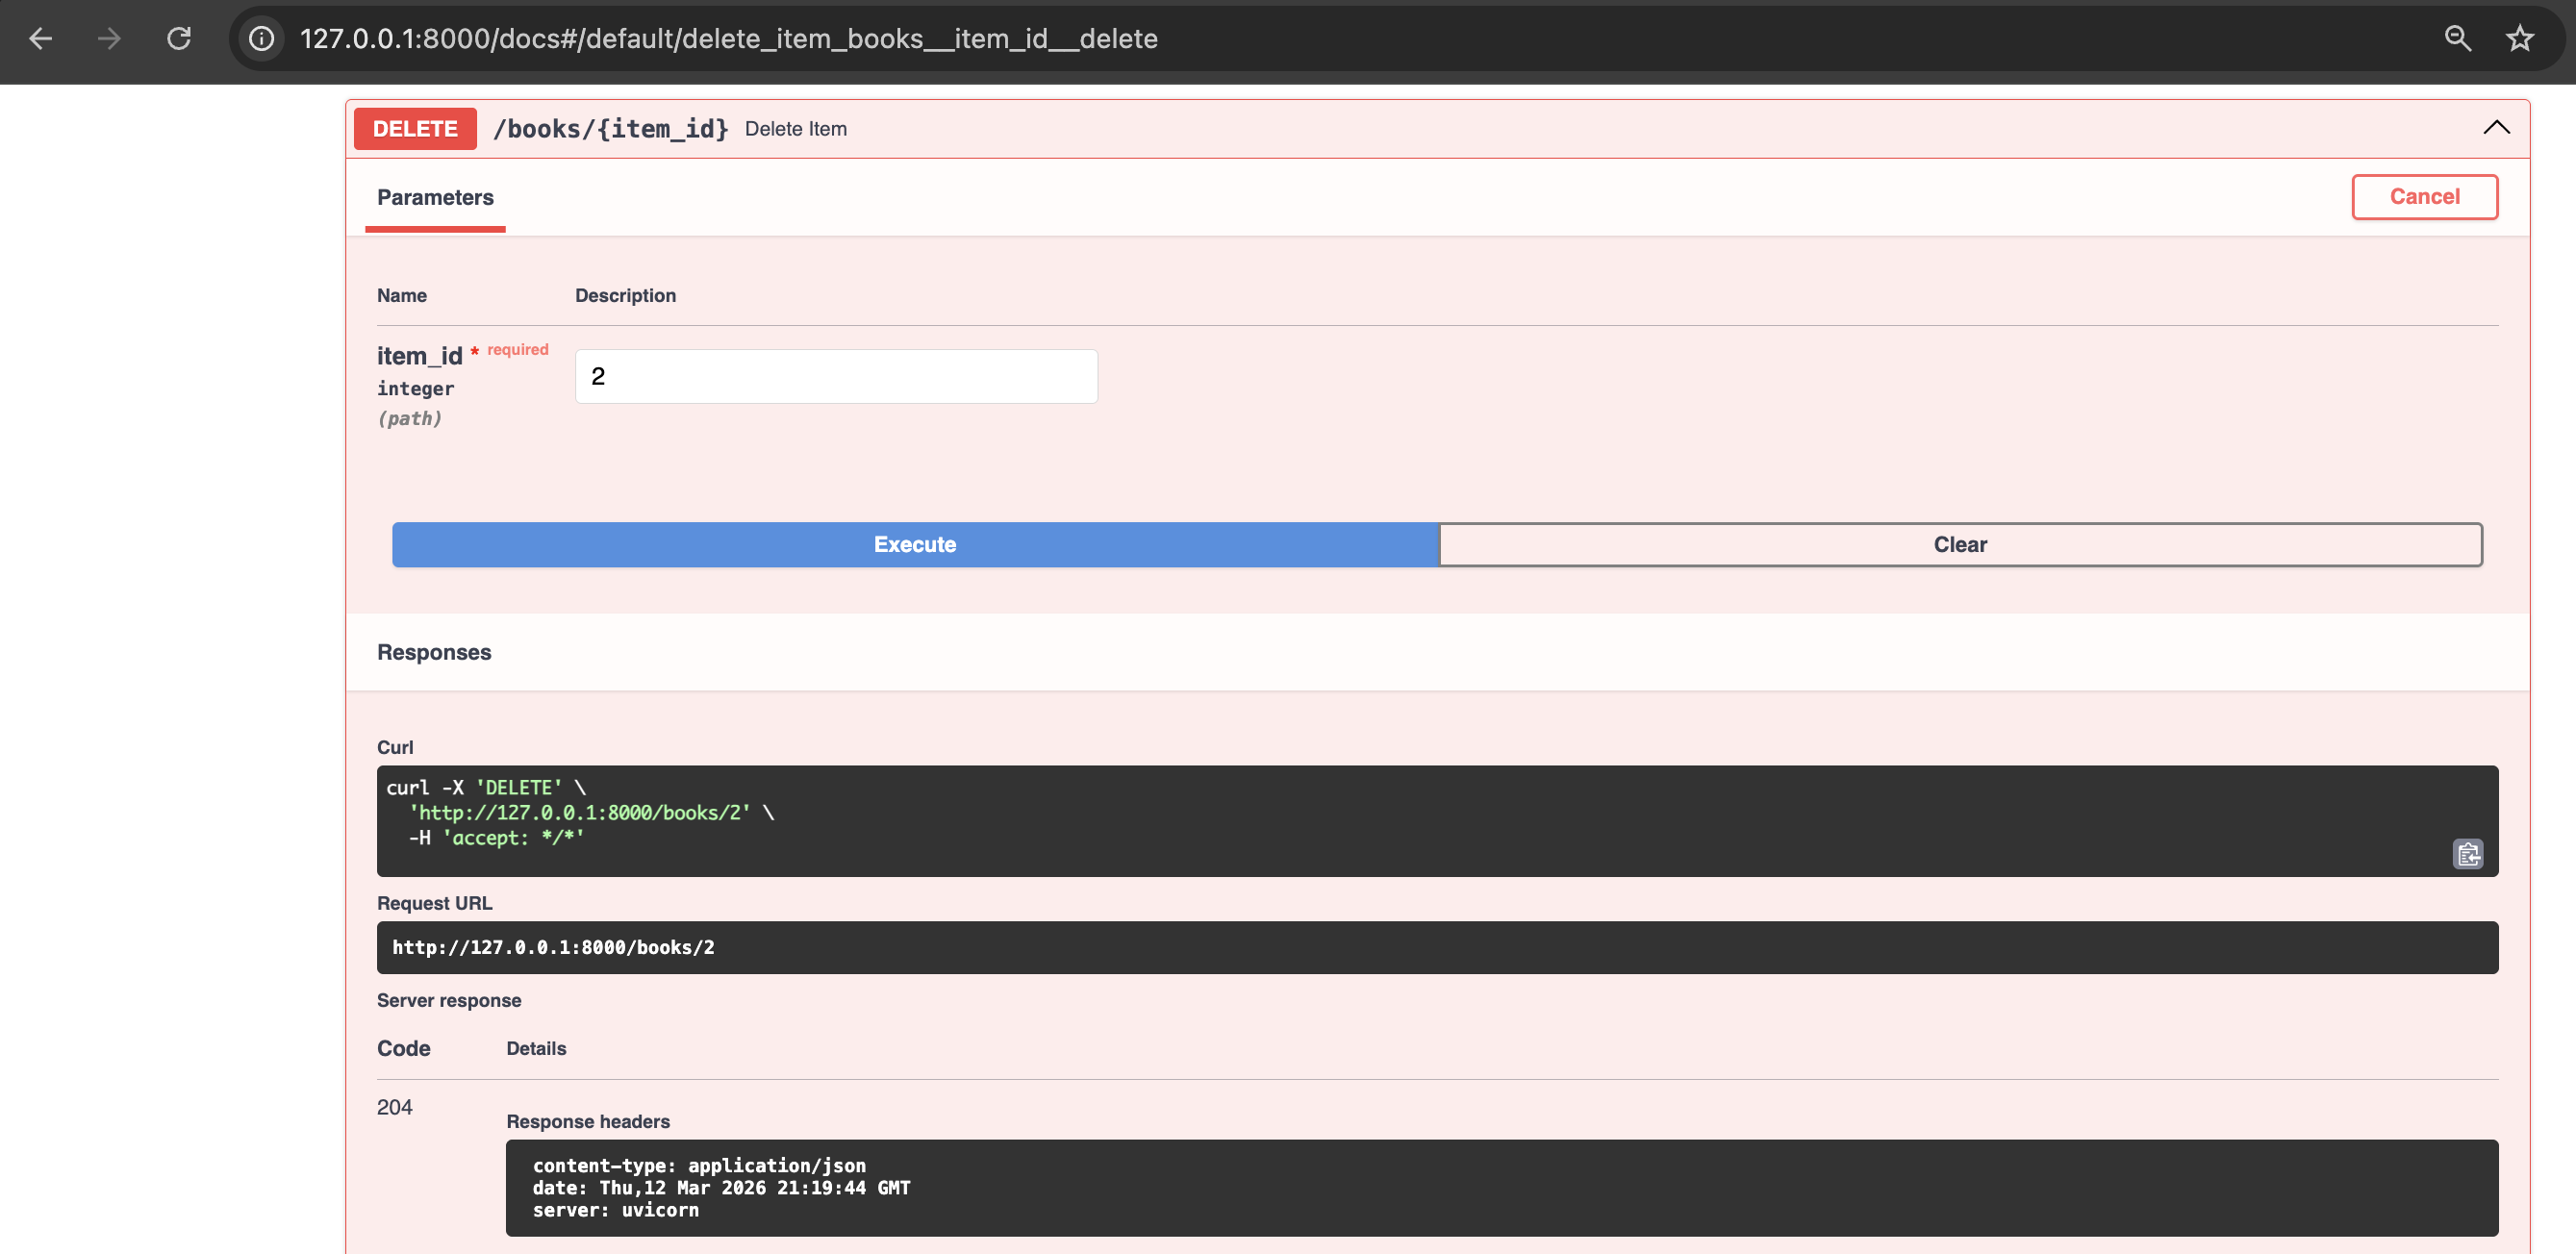
13. Delete a book from the book store</h4>

<p><img src="/assets/images/fastapi/fastapi_delete_request_response.png" alt="fastAPI_delete request response" /></p>

<h4 id="14-list-all-books-in-the-book-store-after-update-and-delete-operations">
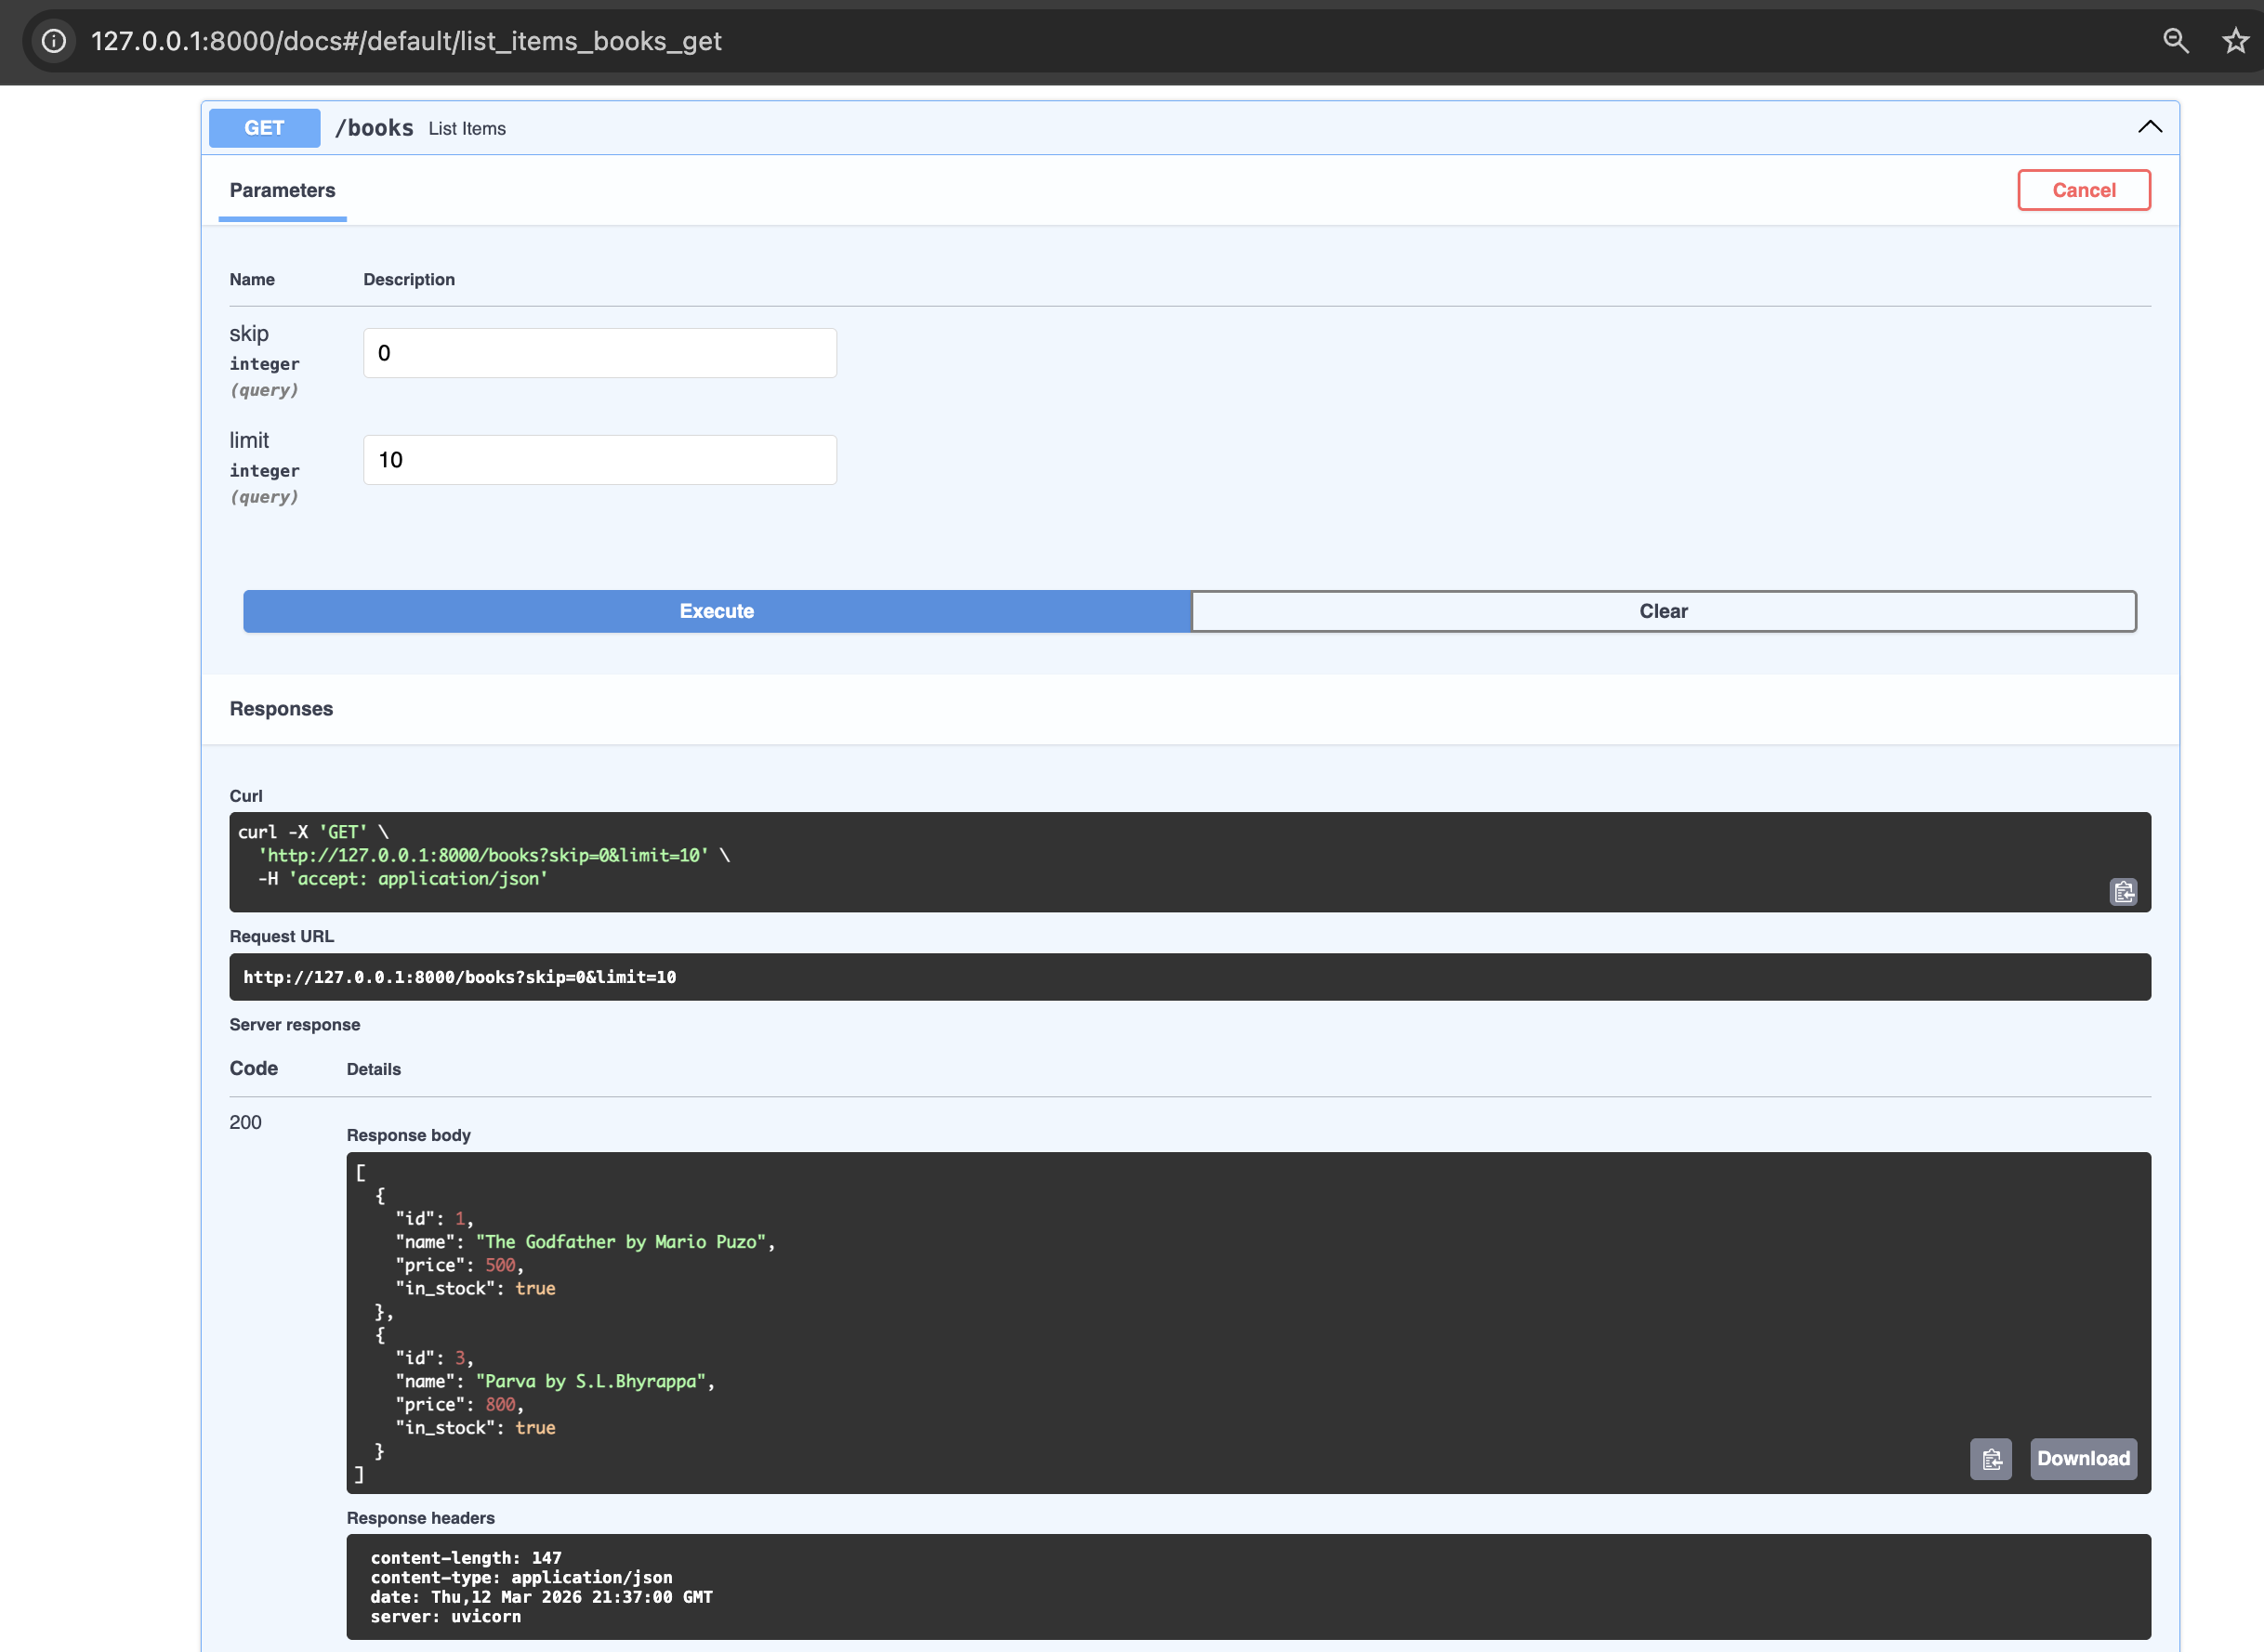
14. List all books in the book store after update and delete operations</h4>

<p><img src="/assets/images/fastapi/fastapi_request_response_get_final.png" alt="fastAPI_get final response" /></p>

<h1 id="understanding-decorators-in-python--optional-section-for-people-well-versed-with-this-python-feature">Understanding Decorators in python ( optional section for people well versed with this python feature)</h1>
<p>As FastAPI uses decorators heavily, let’s understand this elegant Python feature. Basically, a decorator is a function that wraps another function to add behaviour before or after it runs without modifying the existing function.</p>

<p>Think of a decorator as a notebook cover — the notebook (your function) stays the same, the cover adds something around it.</p>

<p>Let us understand this with examples:</p>

<ul>
  <li>Without decorator</li>
</ul>

<div class="language-plaintext highlighter-rouge"><div class="highlight"><pre class="highlight"><code>def my_decorator(func):
    def wrapper():
        print("Before")
        func()          # call the original function
        print("After")
    return wrapper

def greet():
    print("Hello!")

# manually wrap it
greet = my_decorator(greet)
greet()

# Output:
# Before
# Hello!
# After
</code></pre></div></div>

<ul>
  <li>With decorator</li>
</ul>

<div class="language-plaintext highlighter-rouge"><div class="highlight"><pre class="highlight"><code>def my_decorator(func):
    def wrapper():
        print("Before")
        func()
        print("After")
    return wrapper

@my_decorator       # same as: greet = my_decorator(greet)
def greet():
    print("Hello!")

greet()

# Output:
# Before
# Hello!
# After
</code></pre></div></div>

<ul>
  <li>Decorator with arguments</li>
</ul>

<div class="language-plaintext highlighter-rouge"><div class="highlight"><pre class="highlight"><code>def repeat(times):
    def decorator(func):
        def wrapper(*args, **kwargs):
            for _ in range(times):
                func(*args, **kwargs)
        return wrapper
    return decorator

@repeat(times=3)
def greet():
    print("Hello!")

greet()
# Hello!
# Hello!
# Hello!
</code></pre></div></div>

<h1 id="conclusion">Conclusion</h1>
<p>In this post we have explored the basics of FastAPI, equipping you to start building projects using this web framework. As next step one can learn about integrating FastAPI with SQLAlchemy, a powerful combination for building database-backed APIs and also explore writing automated tests for your API using FastAPI’s TestClient tool.</p>

<h1 id="references">References</h1>
<ol>
  <li>https://fastapi.tiangolo.com/</li>
  <li>https://docs.pydantic.dev</li>
  <li>https://www.uvicorn.org</li>
  <li>https://www.starlette.io</li>
  <li>https://docs.python.org/3/glossary.html#term-decorator</li>
  <li>https://github.com/zhanymkanov/fastapi-best-practices?tab=readme-ov-file#cpu-intensive-tasks</li>
</ol>]]></content><author><name>author:sathyendhra</name></author><category term="Technical" /><summary type="html"><![CDATA[Introduction I’ve been hearing a lot about a Python web framework called FastAPI. The purpose of this post is to understand the basics of FastAPI by exploring:]]></summary></entry><entry><title type="html">Understanding REST</title><link href="https://absorb-a-concept.com/technical/2026/01/07/rest.html" rel="alternate" type="text/html" title="Understanding REST" /><published>2026-01-07T00:00:00+00:00</published><updated>2026-01-07T00:00:00+00:00</updated><id>https://absorb-a-concept.com/technical/2026/01/07/rest</id><content type="html" xml:base="https://absorb-a-concept.com/technical/2026/01/07/rest.html"><![CDATA[<h1 id="introduction">Introduction</h1>
<p>In this post, the focus is on understanding the basics of REST and building a sample  REST API using DRF (Django REST Framework). Now let’s get started in absorbing the concept of REST.</p>

<h1 id="what-is-rest">What is REST?</h1>
<p>REST powers over 80% of public APIs today. Let me start off by saying REST is an acronym which when expanded reads “REpresentational State Transfer”. It is called an architectural style as it provides a set of design principles and constraints that guide the creation of web services systems. Basically REST helps in building web services that help in communicating between different software applications.</p>

<p>Now that I have explained (at least on a high level) about what is REST, now it’s time to understand why REST?</p>

<h1 id="why-rest">Why REST?</h1>
<p>REST API is used primarily because of its simplicity. Ease of use is the main reason for its adoption in the world. The methods like GET, POST, PATCH, PUT make it convenient to use it.</p>

<h1 id="how-rest">How REST?</h1>
<p>As REST is an architectural style, it is implemented with the below constraints or  guidelines,</p>

<ul>
  <li>stateless</li>
  <li>cacheable</li>
  <li>uniform interface</li>
  <li>client server</li>
  <li>layered system</li>
  <li>code on demand</li>
</ul>

<p>Let me elaborate on the above constraints:</p>

<h2 id="client-server">Client Server</h2>
<p>REST API follows client server architecture where client acts as the trigger system and server services the request from client with a response.</p>

<h2 id="stateless">Stateless</h2>
<p>The term stateless is that the server does not hold the state of the request, the client is responsible in keeping the entire state of the session.</p>

<h2 id="cacheable">Cacheable</h2>
<p>Due to stateless constraint efficiency takes a hit, to overcome this and improve the efficiency  client side caching is allowed. This comes with the advantage of improving the efficiency but also the disadvantage of not getting the latest data from the server.</p>

<h2 id="uniform-interface">Uniform Interface</h2>
<p>Standard HTTP methods like GET, POST, PUT, PATCH, DELETE etc. + URI (uniform resource identifiers) are used by REST API which is a uniform interface for communicating between client and server</p>

<h2 id="layered-component">Layered Component</h2>
<p>In layered component architecture each component cannot see beyond the immediate layer it is interacting.</p>

<h2 id="code-on-demand">Code on demand</h2>
<p>REST  provides client with the capability to execute code in the form of script or applets.</p>

<h1 id="what-is-idempotency-in-rest">What is idempotency in REST?</h1>
<p>When talking about REST one must mention about “Idempotency” . In context of REST, idempotency is a property where making multiple identical requests has the same effect on the server’s state as making a single request.</p>

<h1 id="rest-methods">REST Methods</h1>
<p>The most common REST methods are listed and described below:</p>
<ul>
  <li>GET - Retrieves data (or representation of a resource) from server.</li>
  <li>POST - Push/submit data to the server to create a new resource or trigger an action(side effect). This method is not idempotent and same back to back post requests results in two new POST requests to server.</li>
  <li>PUT - Updates existing resources with submitted data. It is idempotent. If the resource does not exist then it can create a new resource(the behaviour is dependent on the API design)</li>
  <li>PATCH - This method is used to partially modify data of existing resource unlike PUT where the whole data is modified, it is generally not considered safe as it has the ability to change server state and it is not idempotent by default.</li>
  <li>DELETE - Removes/deletes a specific resource from server.</li>
  <li>OPTIONS - Fetches the communication options(like methods supported) for a resource/end point.</li>
  <li>HEAD - Retrieves only headers and not the body. It can be used as a check of existence of a resource without transferring the entire data.</li>
</ul>

<h1 id="what-is-cors-in-rest">What is CORS in REST?</h1>
<p>CORS is an acronym for ‘Cross Origin for Resource Sharing’. It is a feature in which one domain can access data/resources from different domain. CORS should be enabled in REST API to avoid the default block  by same-Origin policy.</p>

<h1 id="when-to-use">When to use</h1>
<ul>
  <li>Third party integrations to your website - for e.g., a payment processors, link social media platforms or link mapping services</li>
  <li>IoT devices - Helps IoT devices to communicate with cloud platforms &amp; systems with minimum bandwidth.</li>
  <li>Cloud Computing &amp; Microservices</li>
  <li>Public facing API - REST API is best to expose API which is widely consumed by developers using various programming languages and applications.</li>
  <li>Good for managing data operations on server (CRUD operations)</li>
</ul>

<h1 id="when-not-to-use-rest-api">When not to use REST API?</h1>
<ul>
  <li>Simple traditional website - for e.g., a text based website querying static data from database.</li>
  <li>High performance and low latency applications - The stateless nature of REST might hinder performance.</li>
  <li>Specialised internal only microservices - An internal system where client and server is controlled by the same team the strict constraints of REST are unnecessary.</li>
  <li>Security - REST APIs don’t have built-in security. The developers must manually implement robust security measures increasing the risk of misconfigurations and vulnerabilities if not handled by experts. Built-in security is found in older protocols like SOAP.</li>
</ul>

<h1 id="rest-in-action-using-drf">REST in action using DRF</h1>
<h2 id="prerequisites">Prerequisites</h2>
<ul>
  <li>Python (v3.13 used in this tutorial)</li>
  <li>Django module installed</li>
</ul>

<p>Now let us build our own REST API using DRF which will solve the below problem statement.</p>
<h2 id="problem-statement">Problem Statement</h2>
<p>Develop REST API using DRF for inventory of a bakery. The API should be able to list all items, create a new item, update an item and delete an item.</p>
<h2 id="steps">Steps</h2>
<h4 id="1-install-django-and-django-rest-framework-python-modules">1. Install django and django rest framework python modules</h4>
<div class="language-plaintext highlighter-rouge"><div class="highlight"><pre class="highlight"><code>%pip3 install django djangorestframework
Collecting django
  Downloading django-6.0.1-py3-none-any.whl.metadata (3.9 kB)
Collecting djangorestframework
  Downloading djangorestframework-3.16.1-py3-none-any.whl.metadata (11 kB)
Collecting asgiref&gt;=3.9.1 (from django)
  Downloading asgiref-3.11.0-py3-none-any.whl.metadata (9.3 kB)
Collecting sqlparse&gt;=0.5.0 (from django)
  Downloading sqlparse-0.5.5-py3-none-any.whl.metadata (4.7 kB)
Downloading django-6.0.1-py3-none-any.whl (8.3 MB)
   ━━━━━━━━━━━━━━━━━━━━━━━━━━━━━━━━━━━━━━━━ 8.3/8.3 MB 40.0 MB/s eta 0:00:00
Downloading djangorestframework-3.16.1-py3-none-any.whl (1.1 MB)
   ━━━━━━━━━━━━━━━━━━━━━━━━━━━━━━━━━━━━━━━━ 1.1/1.1 MB 39.4 MB/s eta 0:00:00
Downloading asgiref-3.11.0-py3-none-any.whl (24 kB)
Downloading sqlparse-0.5.5-py3-none-any.whl (46 kB)
Installing collected packages: sqlparse, asgiref, django, djangorestframework
Successfully installed asgiref-3.11.0 django-6.0.1 djangorestframework-3.16.1 sqlparse-0.5.5
</code></pre></div></div>
<h4 id="2-start-project-and-app-using-django---this-creates-the-folder-structure-for-us-to-get-started">2. Start project and app using django - this creates the folder structure for us to get started</h4>
<div class="language-plaintext highlighter-rouge"><div class="highlight"><pre class="highlight"><code>[]% django-admin startproject tastybites .
[]% ls
manage.py	tastybites
[]% cd tastybites
[tastybites] % ls
__init__.py	asgi.py		settings.py	urls.py		wsgi.py
[tastybites] % cd ..
[] % django-admin startapp biscuits
[] % django-admin startapp cakes
</code></pre></div></div>
<h4 id="3-sync-db">3. Sync DB</h4>
<div class="language-plaintext highlighter-rouge"><div class="highlight"><pre class="highlight"><code>[]%python manage.py migrate
Operations to perform:
  Apply all migrations: admin, auth, contenttypes, sessions
Running migrations:
  Applying contenttypes.0001_initial... OK
  Applying auth.0001_initial... OK
  Applying admin.0001_initial... OK
  Applying admin.0002_logentry_remove_auto_add... OK
  Applying admin.0003_logentry_add_action_flag_choices... OK
  Applying contenttypes.0002_remove_content_type_name... OK
  Applying auth.0002_alter_permission_name_max_length... OK
  Applying auth.0003_alter_user_email_max_length... OK
  Applying auth.0004_alter_user_username_opts... OK
  Applying auth.0005_alter_user_last_login_null... OK
  Applying auth.0006_require_contenttypes_0002... OK
  Applying auth.0007_alter_validators_add_error_messages... OK
  Applying auth.0008_alter_user_username_max_length... OK
  Applying auth.0009_alter_user_last_name_max_length... OK
  Applying auth.0010_alter_group_name_max_length... OK
  Applying auth.0011_update_proxy_permissions... OK
  Applying auth.0012_alter_user_first_name_max_length... OK
  Applying sessions.0001_initial... OK
</code></pre></div></div>

<h4 id="4-define-models-">4. Define Models: <br /></h4>
<p>Models in django is used to define database fields used by the apps.</p>

<div class="language-plaintext highlighter-rouge"><div class="highlight"><pre class="highlight"><code>#biscuits/models.py
from django.db import models

# Create your models here.
class BiscuitStock(models.Model):
    name = models.CharField(max_length=200)
    price = models.IntegerField()
    quantity = models.IntegerField()
</code></pre></div></div>

<div class="language-plaintext highlighter-rouge"><div class="highlight"><pre class="highlight"><code>#cakes/models.py
from django.db import models

# Create your models here.
class CakeStock(models.Model):
    name = models.CharField(max_length=200)
    price = models.IntegerField()
    quantity = models.IntegerField()
</code></pre></div></div>

<h4 id="5-define-serializers-">5. Define Serializers: <br /></h4>
<p>Let us understand, “What are serializers?” <br />
In the context of Django, serializers help convert(or serialize) complex data types like django models,
querysets into native python datatypes which then can be rendered into JSON, XML or anyother supported
format. <br /></p>

<div class="language-plaintext highlighter-rouge"><div class="highlight"><pre class="highlight"><code>#biscuits/serializers.py 
from biscuits.models import BiscuitStock
from rest_framework import serializers

class BiscuitStockSerializer(serializers.HyperlinkedModelSerializer):
    class Meta:
        model = BiscuitStock
        fields = ["name","price","quantity"]
</code></pre></div></div>
<div class="language-plaintext highlighter-rouge"><div class="highlight"><pre class="highlight"><code>#cakes/serializers.py
from cakes.models import CakeStock
from rest_framework import serializers

class CakeStockSerializer(serializers.HyperlinkedModelSerializer):
    class Meta:
        model = CakeStock
        fields = ["name","quantity","price"]
</code></pre></div></div>

<h4 id="6-define-views-">6. Define views: <br /></h4>
<p>Views in django are used to process web requests and return web response</p>

<div class="language-plaintext highlighter-rouge"><div class="highlight"><pre class="highlight"><code>#biscuits/views.py
from rest_framework import  viewsets
from biscuits.models import BiscuitStock
from biscuits.serializers import BiscuitStockSerializer


# Create your views here.
class BiscuitsViewSet(viewsets.ModelViewSet):
    queryset = BiscuitStock.objects.all().order_by("name")
    serializer_class = BiscuitStockSerializer
</code></pre></div></div>

<div class="language-plaintext highlighter-rouge"><div class="highlight"><pre class="highlight"><code>#cakes/views.py
from rest_framework import viewsets
from cakes.models import CakeStock
from cakes.serializers import CakeStockSerializer

# Create your views here.
class  CakeStockViewset(viewsets.ModelViewSet):
    queryset = CakeStock.objects.all().order_by("name")
    serializer_class = CakeStockSerializer
</code></pre></div></div>

<h4 id="7-define-urls-">7. Define urls <br /></h4>
<p>In django urls.py is used for mapping different web address(url’s) to their corresponding python functions or views</p>

<div class="language-plaintext highlighter-rouge"><div class="highlight"><pre class="highlight"><code>#tastybites/urls.py
from django.urls import include,path
from rest_framework import routers

from biscuits.views import BiscuitsViewSet
from cakes.views import CakeStockViewset

router = routers.DefaultRouter()
router.register(r"biscuits",BiscuitsViewSet)
router.register("cakes",CakeStockViewset)

urlpatterns = [
    path("",include(router.urls))
]
</code></pre></div></div>

<h4 id="8-in-settingspy-add-rest_frameworkbiscuitscakes-to-installed_apps">8. In settings.py add ‘rest_framework’,’biscuits’,’cakes’ to INSTALLED_APPS</h4>

<div class="language-plaintext highlighter-rouge"><div class="highlight"><pre class="highlight"><code>INSTALLED_APPS = [
    'biscuits',
    'cakes',
    'django.contrib.admin',
    'django.contrib.auth',
    'django.contrib.contenttypes',
    'django.contrib.sessions',
    'django.contrib.messages',
    'django.contrib.staticfiles',
    'rest_framework',
]
</code></pre></div></div>
<h4 id="9-run-makemigrations-for-each-app-to-define-db-schema-followed-by-migrate-to-sync-db">9. Run makemigrations for each app to define DB schema followed by migrate to sync DB</h4>

<div class="language-plaintext highlighter-rouge"><div class="highlight"><pre class="highlight"><code>[]% python manage.py makemigrations biscuits
Migrations for 'biscuits':
  biscuits/migrations/0001_initial.py
    + Create model BiscuitStock
</code></pre></div></div>
<div class="language-plaintext highlighter-rouge"><div class="highlight"><pre class="highlight"><code>[]% python manage.py makemigrations cakes   
Migrations for 'cakes':
  cakes/migrations/0001_initial.py
    + Create model CakeStock
</code></pre></div></div>
<div class="language-plaintext highlighter-rouge"><div class="highlight"><pre class="highlight"><code>python manage.py migrate                
Operations to perform:
  Apply all migrations: admin, auth, biscuits, cakes, contenttypes, sessions
Running migrations:
  Applying biscuits.0001_initial... OK
  Applying cakes.0001_initial... OK
</code></pre></div></div>

<h4 id="10-folder-structure">10. Folder structure</h4>
<div class="language-plaintext highlighter-rouge"><div class="highlight"><pre class="highlight"><code>[]% find .
./cakes/migrations/__init__.py
./cakes/migrations/0001_initial.py
./cakes/models.py
./cakes/serializers.py
./cakes/__init__.py
./cakes/apps.py
./cakes/admin.py
./cakes/tests.py
./cakes/views.py
./db.sqlite3
./manage.py
./biscuits/migrations/__init__.py
./biscuits/migrations/0001_initial.py
./biscuits/models.py
./biscuits/serializers.py
./biscuits/__init__.py
./biscuits/apps.py
./biscuits/admin.py
./biscuits/tests.py
./biscuits/views.py
./tastybites/asgi.py
./tastybites/__init__.py
./tastybites/settings.py
./tastybites/urls.py
./tastybites/wsgi.py
</code></pre></div></div>

<h4 id="11-run-your-server">11. Run your server</h4>

<div class="language-plaintext highlighter-rouge"><div class="highlight"><pre class="highlight"><code>python manage.py runserver
</code></pre></div></div>
<h4 id="12-navigate-to-http1270018000-in-your-browser-which-lists-items-using-get-and-create-an-item-using-post">12. Navigate to http://127.0.0.1:8000 in your browser which lists items using “GET” and create an item using “POST”</h4>

<p><img src="/assets/images/CreateCake.png" alt="create_cake" /></p>

<h4 id="13-created-an-item">13. Created an item</h4>

<p><img src="/assets/images/CreatedCake.png" alt="created_cake" /></p>

<h4 id="14-update-an-item-using-put-after-navigating-to-http1270018000cakes2">14. Update an item using “PUT” after navigating to http://127.0.0.1:8000/cakes/2</h4>

<p><img src="/assets/images/UpdateCakeEntry.png" alt="update_cake" /></p>

<h4 id="15-quantity-field-updated">15. Quantity field updated</h4>

<p><img src="/assets/images/UpdatedCake.png" alt="updated_cake" /></p>

<h4 id="16-delete-an-entry-using-delete-after-navigating-to-http1270018000cakes2">16. Delete an entry using “DELETE” after navigating to http://127.0.0.1:8000/cakes/2</h4>

<p><img src="/assets/images/DeleteCake.png" alt="delete_cake" /></p>

<h4 id="16-deleted-an-entry">16. Deleted an entry</h4>

<p><img src="/assets/images/DeletedCake.png" alt="deleted_cake" /></p>

<h2 id="link-to-github-for-you-to-fork-and-build">Link to github for you to fork and build</h2>
<div class="language-plaintext highlighter-rouge"><div class="highlight"><pre class="highlight"><code>https://github.com/rsathyendhra/django-rest-framework-sample
</code></pre></div></div>

<h1 id="reference">Reference</h1>
<ul>
  <li>https://www.django-rest-framework.org/tutorial/quickstart/</li>
</ul>]]></content><author><name>author:sathyendhra</name></author><category term="Technical" /><summary type="html"><![CDATA[Introduction In this post, the focus is on understanding the basics of REST and building a sample REST API using DRF (Django REST Framework). Now let’s get started in absorbing the concept of REST.]]></summary></entry><entry><title type="html">Kubernetes</title><link href="https://absorb-a-concept.com/technical/2026/01/04/kubernetes.html" rel="alternate" type="text/html" title="Kubernetes" /><published>2026-01-04T00:00:00+00:00</published><updated>2026-01-04T00:00:00+00:00</updated><id>https://absorb-a-concept.com/technical/2026/01/04/kubernetes</id><content type="html" xml:base="https://absorb-a-concept.com/technical/2026/01/04/kubernetes.html"><![CDATA[<h1 id="introduction">Introduction</h1>
<p>“Kubernetes” – does this term ring a bell? Especially to all the technology enthusiasts out there you must have heard or come across this term, If your answer is yes and you understand everything around it, you may give this concept a skip. For the rest who have heard the term and know briefly about it, stick around and browse through the sections as a refresher and for people who have not heard of this term or are not well versed, worry not, this blog will give you much information to get you started and interested.</p>

<p>The content is divided into 4 parts,</p>

<ul>
  <li>History</li>
  <li>What is Kubernetes?</li>
  <li>Why Kubernetes?</li>
  <li>How to get started with Kubernetes?</li>
</ul>

<h1 id="history">History</h1>
<p>Before directly jumping into getting to knowing kubernetes, it is best to understand the evolution of deployments in the software industry. Software deployment is simply a way of running applications, traditionally they were run on physical servers. There were limitations in running application in physical servers which led to the inception of a concept called “Virtualization”.</p>

<h2 id="what-are-the-limitationsdrawbacks-of-running-application-on-physical-servers">What are the limitations/drawbacks of running application on physical servers?</h2>
<p>One major disadvantage is the lack of ability of sharing resources among different processes easily. Cost also plays an important role, a physical server is pricey to maintain(inclusive of real estate and infra for cooling). Scaling up is not easy and time consuming.</p>

<h2 id="what-is-virtualization">What is virtualization?</h2>
<p>In simple terms it is a software which allows to deploy(create) multiple machines using resources of an underlying physical hardware(host).</p>

<p>Virtualization made software or app developments convenient but to further simplify software deployments the concept of container deployments came into existence.</p>

<h2 id="what-is-container">What is container?</h2>
<p>An application and its dependencies packaged into one portable unit which is also light weight is referred to as a container.</p>

<p>he high rate of adoption of container deployments gave rise to widespread use of “kubernetes”. So simply put without containers, kubernetes would not exist.</p>

<p>Now with the above concepts in mind, let us proceed to address the main topic i.e.,\</p>

<h1 id="what-is-kubernetes">What is Kubernetes?</h1>
<p>Kubernetes is an orchestrator which intelligently helps in managing multiple container applications spanning across many hosts.</p>

<h1 id="why-kubernetes">Why Kubernetes?</h1>
<p>The main purpose of container is optimum resource utilization, kubernetes with its intelligence and orchestration help to achieve this across multiple hosts, thereby helping to unlock the purpose and potential of containerized applications.</p>

<h1 id="kubernetes-vs-docker">Kubernetes vs docker</h1>
<p><img src="/assets/images/dockervskubernetes.png" alt="docker vs kubernetes" /></p>

<p>Docker is a containerization platform which helps in building, implementing and running containerized applications limited to one docker instance per host os  whereas Kubernetes is much more, it is a platform for running and managing containers from many container runtimes and operates on a cluster level on many hosts. Docker is one of the many runtimes kubernetes supports.</p>

<h1 id="how-to-get-started-with-kubernetes">How to get started with kubernetes?</h1>
<h2 id="steps-for-mac">Steps for mac</h2>

<p>Install kubectl</p>
<div class="language-plaintext highlighter-rouge"><div class="highlight"><pre class="highlight"><code>curl -LO "https://dl.k8s.io/release/$(curl -L -s https://dl.k8s.io/release/stable.txt)/bin/darwin/amd64/kubectl"
</code></pre></div></div>

<p>Check Installation</p>
<div class="language-plaintext highlighter-rouge"><div class="highlight"><pre class="highlight"><code>curl -LO "https://dl.k8s.io/release/$(curl -L -s https://dl.k8s.io/release/stable.txt)/bin/darwin/arm64/kubectl.sha256"
echo "$(cat kubectl.sha256)  kubectl" | shasum -a 256 --check
kubectl: OK
</code></pre></div></div>

<p>Make the kubectl binary executable.</p>
<div class="language-plaintext highlighter-rouge"><div class="highlight"><pre class="highlight"><code>chmod +x ./kubectl
</code></pre></div></div>

<p>Move the kubectl binary to a file location on your system PATH.</p>
<div class="language-plaintext highlighter-rouge"><div class="highlight"><pre class="highlight"><code>sudo mv ./kubectl /usr/local/bin/kubectl 
sudo chown root: /usr/local/bin/kubectl
</code></pre></div></div>

<p>Test to ensure the version you installed is up-to-date:</p>
<div class="language-plaintext highlighter-rouge"><div class="highlight"><pre class="highlight"><code>kubectl version --client
Client Version: v1.31.3
Kustomize Version: v5.4.2
</code></pre></div></div>

<p>Verify kubectl configuration</p>
<div class="language-plaintext highlighter-rouge"><div class="highlight"><pre class="highlight"><code>kubectl cluster-info
</code></pre></div></div>

<p>Once the setup is complete, cluster-information can be got. Let us understand more about kubernetes cluster in the next section.</p>

<h1 id="kubernetes-cluster">Kubernetes Cluster</h1>
<p><img src="/assets/images/kube_cluster.png" alt="kube_cluster" /></p>

<p>Kubernetes cluster is composed of two components,</p>
<ul>
  <li>kubernetes nodes</li>
  <li>kubernetes control plane</li>
</ul>

<p>Kubernetes node comprises of:</p>
<ul>
  <li>kubelet - Responsible for running pods along with their containers using container runtime</li>
  <li>kube-porxy - Optional component which is used to maintain networking rules on nodes to implement services.</li>
  <li>container runtime -  container runtime software used by kubelet to run containers.</li>
</ul>

<p>Kubernete control plane consists of</p>
<ul>
  <li>kubeapi server - It is the core component that is responsible to expose http API’s of kubernetes.</li>
  <li>control manager (including optional cloud control manager) - It is a controller to implement kubernetes API behavior</li>
  <li>scheduler - Ensures that all pods are assigned to a suitable node</li>
  <li>etcd - key value datastore for API server data which is conistent and highly avaialble</li>
</ul>

<p>In the next section let us understand about pod in kubernetes and how to create it,</p>

<h1 id="what-is-a-pod-or-what-are-pods-in-kubernetes">What is a pod? or What are pods in kubernetes?</h1>
<p>Pod is smallest deployable unit that can be created and managed by kubernetes. It can contain one or more containers. Generally it is one conatiner per pod but depending on the business use case it can accomodate more than one container.</p>

<h2 id="how-to-deploy-a-sample-pod">How to deploy a sample pod?</h2>
<p>Below is a sample yaml file that deploys a pod running nginx container with image nginx:1.14.2</p>
<div class="language-plaintext highlighter-rouge"><div class="highlight"><pre class="highlight"><code>apiVersion: v1
kind: Pod
metadata:
  name: nginx
spec:
  containers:
  - name: nginx
    image: nginx:1.14.2
    ports:
    - containerPort: 80
</code></pre></div></div>
<p>Save the above file as nginx.yaml and run the below command:</p>
<div class="language-plaintext highlighter-rouge"><div class="highlight"><pre class="highlight"><code>kubectl apply -f nginx.yaml -n &lt;namespace_name&gt;
</code></pre></div></div>
<h2 id="lifecycle-of-a-pod">Lifecycle of a pod</h2>

<p>Pods lifecycle starts with a “pending” phase, followed by “running” when at least one of the containers starts and then moves to “succeeded” if everything goes fine or to  a “failed” phase if one of the container terminated with failure.</p>

<p>In real world, individual pods are generally not deployed, they get deployed using workload resources. Let us understand a little bit about workload resources in kubernetes.</p>

<h2 id="pods-are-ephemeral">Pods are ephemeral</h2>
<p>In kubernetes pods are ephemeral meaning that they can be terminated and redeployed by the nodes and are stateless. If a pod needs its identity and data to be non-ephemeral that can be achieved by making it persistent using statefulsets (a type of workload resource in kubernetes) which is briefly described in the next section.</p>

<h1 id="workload-resources-supported-in-kubernetes">Workload resources supported in kubernetes</h1>
<p>Workload resources can be described as API objects that manage and run applications/services on the cluster by ensuring the correct pods are running to match a specified desired state.</p>

<p>Type of workloads supported by kubernetes</p>

<p>1) Deployments - It manages a set of pods to run an application which does not maintain state
2) StatefulSets - It runs a group of pods to run an application which maintains state. For e.g., application requires persistent storage or stable network identity
3) DaemonSet - It ensures that all nodes have a copy of pod. For e.g., a copy of logs collection running on each node</p>

<p>Other workload types are replicaset,job,cronjob and replicationController.</p>

<h1 id="conclusion">Conclusion</h1>

<p>In this post we have just scratched the surface in trying to understand the concept of kubernetes. With grasp of the above, one can embark on the journey of exploring  deeper into the world of kubernetes.</p>

<h1 id="references">References</h1>
<ul>
  <li>https://kubernetes.io/docs/tutorials/kubernetes-basics/</li>
  <li>https://portworx.com/blog/kubernetes-vs-virtual-machines/</li>
  <li>https://www.atlassian.com/microservices/microservices-architecture/kubernetes-vs-docker#:~:text=Kubernetes%20can%20be%20used%20with,containers%20a%20week%20at%20scale.</li>
  <li>https://www.index.dev/blog/kubernetes-vs-docker</li>
</ul>]]></content><author><name>author:sathyendhra</name></author><category term="Technical" /><summary type="html"><![CDATA[Introduction “Kubernetes” – does this term ring a bell? Especially to all the technology enthusiasts out there you must have heard or come across this term, If your answer is yes and you understand everything around it, you may give this concept a skip. For the rest who have heard the term and know briefly about it, stick around and browse through the sections as a refresher and for people who have not heard of this term or are not well versed, worry not, this blog will give you much information to get you started and interested.]]></summary></entry></feed>